- Prerequisites
- Preparing the environment
- Creating re-usable templates
- Template within templates
- Conclusion
You’ve probably came to this question many times, what are the three fundamental principles that need to adhere to strict compliancy frameworks? Yes, you’ve probably already guessed it. Security, traceability and audibility. Azure DevOps services comes with these principles in mind, but how can you make it visible that Azure roles are assigned against your Azure environment?
In this blog post, you will be going into a deep dive on setting up an Azure pipeline that adheres to these fundamental principles. You will build templates so you can re-use them for your teams, and later you can secure them by placing a Approval check to use those templates for assignments in Azure.
There is a lot that is going to be covered, so this blog will be in series.
Prerequisites
Before you start with this in depth blog post, there are some pre-requisites needed if you want to follow this tutorial:
- A Azure DevOps account
- A code editor like Visual Studio (VSCode)
- The Az Powershell module
- The VSTeam Powershell module
- An Azure Subscription to play in
Preparing the environment
Assuming that your quite familiar with having multiple environments, like test, quality assurance and production, this will be the starting point. To prepare your environment, you can run the below script which will create three resource groups, service principals, and service connections.
- Open Windows Powershell
- Change the values pattoken, subscriptionId, projectName and azdoAccount with your respective environment
When you create the Personal Access Token, make sure that it can manage the Service Connections
# Variables
$PAT = '<patToken>'
$SubscriptionId = '<subscriptionId'
$ProjectName = '<projectName>'
$AzDoAccount = '<azdoAccount>'

# Connect to Azure
Connect-AzAccount -Subscription $SubscriptionId
$Context = Get-AzContext

# Connect VSTeam module
Set-VSTeamAccount -Account $AzDoAccount -PersonalAccessToken $PAT

# Create the resources in Azure and Azure DevOps
$Environments = @('test', 'qa', 'prod')
foreach ($Environment in $Environments) {
    $ResourceGroup = New-AzResourceGroup -Name "rg-data-$Environment" -Location westeurope
    $ServicePrincipal = New-AzADServicePrincipal -DisplayName sp-azdo-connection-$Environment
    New-AzRoleAssignment -ApplicationId $ServicePrincipal.AppId -RoleDefinitionName "Owner" -Scope $ResourceGroup.ResourceId
    Add-VSTeamAzureRMServiceEndpoint -subscriptionName $Context.Subscription.Name `
        -subscriptionId $Context.Subscription.Id `
        -subscriptionTenantId $Context.Tenant.Id `
        -servicePrincipalId $ServicePrincipal.AppId `
        -servicePrincipalKey $ServicePrincipal.PasswordCredentials.SecretText `
        -endpointName azdo-sp-$Environment `
        -ProjectName $ProjectName
}- Run the above script when the values have been propagated
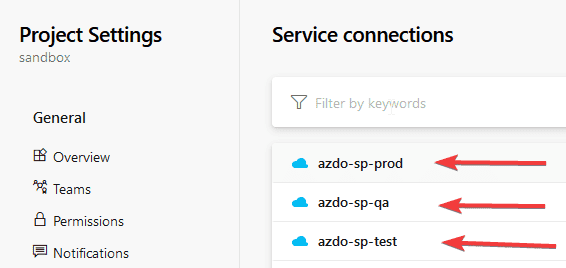
You will see later in this tutorial how this all fits into it’s place. For now, have a quick look which resources have been created.
Creating re-usable templates
In this section, you’ll be going to setup the templates that can be used amongst pipelines that will be created by you or your team members. Inside these templates, the role assignment will be configured, you’ll primarily focus on the New-AzRoleAssignment cmdlet, and Remove-AzRoleAssignment cmdlet. Let’s get started by creating the structure. Assuming that you already have a repository checked out, in this tutorial it is called Templates.
- In your favorite editor, create the following folder structure
- Inside the task folder, create a file called azure-rbac-powershell-task.yml
- In the task YAML file, copy the following content which is an Azure Powershell script to assign roles based on the parameters that you later going to define. You see that the AzureSubscription and Scope are dynamically build up based on the environment that is going to be passed
parameters:
- name: environmentName
  type: string
- name: roleAssigner
  type: string
  values:
  - New
  - Remove
- name: objectId
  type: string
- name: scope
  type: string
- name: roleDefinitionName
  type: string
- name: azureSubscription
  type: string

steps:
  - task: AzurePowershell@5
    displayName: 'Azure role assigner'
    inputs:
      azureSubscription: "${{ parameters.azureSubscription }}-${{ parameters.environmentName }}"
      azurePowerShellVersion: 'LatestVersion'
      ScriptType: 'InlineScript'
      Inline: |
        $Params = @{
          ObjectId = "${{ parameters.objectId }}"
          Scope = "${{ parameters.Scope }}-${{ parameters.environmentName }}"
          RoleDefinitionName = "${{ parameters.roleDefinitionName }}"
        }

        $RoleAssignment = Get-AzRoleAssignment @Params -ErrorAction SilentlyContinue
        if (-not $RoleAssignment) {
          if ("${{ parameters.roleAssigner }}" -ne 'New') {
            Write-Output "Removing role assignment..."
            try {
              $RoleAssignment = Remove-AzRoleAssignment @Params
              return $RoleAssignment
            } catch {
              Write-Host "##vso[task.logissue type=error]$($_.Exception.Message)"
            }
          }
          Write-Output "Creating new role assignment..."
          try {
            $RoleAssignment = New-AzRoleAssignment @Params
            return $RoleAssignment
          } catch {
            Write-Host "##vso[task.logissue type=error]$($_.Exception.Message)"
          }
        } else {
          Write-Host "##vso[task.logissue type=warning]That role assignment already exist, to re-add please remove the role assignment first"
}- Inside the job folder, create a file called azure-rbac-powershell-job.yml
- In the job YAML file, copy the following content to reference the task
parameters:
- name: environmentName
  type: string
- name: roleAssigner
  type: string
  values:
  - New
  - Remove
- name: objectId
  type: string
- name: scope
  type: string
- name: roleDefinitionName
  type: string
- name: azureSubscription
  type: string

jobs:
  - job: Assigner_${{ parameters.environmentName }}
    displayName: 'Azure role assigner - ${{ parameters.environmentName }}'
    steps:
      - template: ../task/azure-rbac-powershell-task.yml
        parameters:
          environmentName: ${{ parameters.environmentName }}
          roleAssigner: ${{ parameters.roleAssigner }}
          objectId: ${{ parameters.objectId }}
          scope: ${{ parameters.scope }}
          roleDefinitionName: ${{ parameters.roleDefinitionName }}
azureSubscription: ${{ parameters.azureSubscription }}- Now you also need a stage, so inside the stage folder, create a file called azure-rbac-powershell-stage.yml and copy the following content in
parameters:
- name: environmentName
  type: string
- name: roleAssigner
  type: string
  values:
  - New
  - Remove
- name: objectId
  type: string
- name: scope
  type: string
- name: roleDefinitionName
  type: string
- name: azureSubscription
  type: string

stages:
  - stage: Assigner_${{ parameters.environmentName }}
    displayName: 'Azure role assigner - ${{ parameters.environmentName }}'
    jobs:
      - template: ../job/azure-rbac-powershell-job.yml
        parameters:
          environmentName: ${{ parameters.environmentName }}
          roleAssigner: ${{ parameters.roleAssigner }}
          objectId: ${{ parameters.objectId }}
          scope: ${{ parameters.scope }}
          roleDefinitionName: ${{ parameters.roleDefinitionName }}
          azureSubscription: ${{ parameters.azureSubscription }}
Oef, that was suddenly a lot of code, so let’s summaries what is going on here.
-
azure-rbac-powershell-task.yml: has 6 parameters to execute a Azure Powershell script that uses 3 values, the objectId, roleDefinitionName and the scope
- environementName: you can fill in the environment that was populated during the preparation of the environment, like test, qa or prod
- roleAssigner: parameter to check wether you want to create a new role assignment or remove
- objectId: the Object ID that you can find for example of a user or service principal
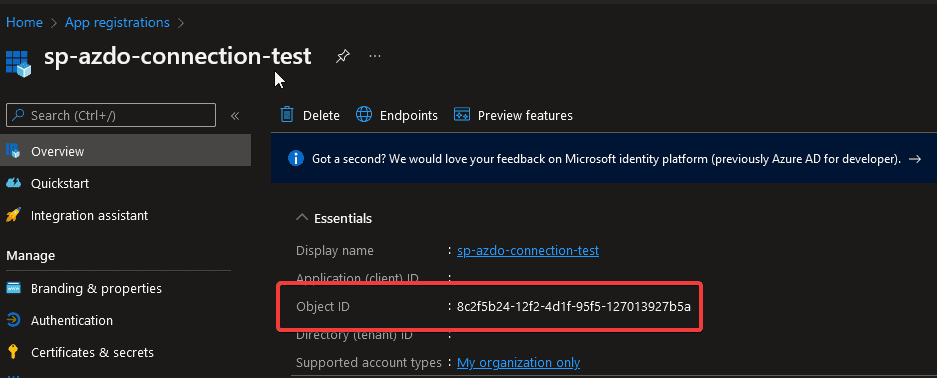
- scope: the scope of a resource, in the below example it is the resource group that was created

- roleDefinitionName: the role that you can give to the Object ID, Contributor as example
- azureSubscription: the service connection to target to without the environment, during the creation of the environment, the prefix would be rg-data
- azure-rbac-powershell-job.yml: has the same parameters as the tasked, and specifies the jobs to make up the stage. It targets the azure-rbac-powershell-task.yml as template for re-usability purpose
- azure-rbac-powershell-stage.yml: the same as the job template, and is the collection of jobs, in this case it targets the azure-rbac-powershell-job.yml
Now there is one more thing to do in the templates, and that is adding a template stage which wraps all the environments and configuration in one. It nearly looks like you are doing some Inception here…
Template within templates
- Still in your code editor, add one more fill under the stage folder called azure-rbac-powershell-template-stage.yml
- Inside this file, add the following content
parameters:
- name: environments
  type: object
  default:
  - name: test
  - name: qa
  - name: prod
- name: taskConfiguration
  type: object
  default:
  - roleAssigner: 'New'
    objectId: ''
    scope: ''
    roleDefinitionName: ''
    azureSubscription: ''

stages:
  - ${{ each environment in parameters.environments }}:
    - ${{ each configuration in parameters.taskConfiguration }}:
      - template: azure-rbac-powershell-stage.yml
        parameters:
          environmentName: ${{ environment.name }}
          roleAssigner: ${{ configuration.roleAssigner }}
          objectId: ${{ configuration.objectId }}
          scope: ${{ configuration.scope }}
          roleDefinitionName: ${{ configuration.roleDefinitionName }}
          azureSubscription: ${{ configuration.azureSubscription }}
You can see that the parameters are now different that needs to be given.
- environments: here you can specify which environments you want to target
- taskConfiguration: any YAML structure can be specified, and is passed a long in a for each loop to the azure-rbac-powershell-stage.yml
You have now successfully created the required templates! Let’s see it in action. Before moving to the next section, make sure that you commit all the code to your repository, in this example it will be the Azure Repos.
Extending templates
As already stated in the introduction, security is quite important in companies that have to follow strict compliancy rules. Using the extends syntax in YAML, gives us the ability to securely enforcing that a pipeline extends from a particular template. You are already probably getting the picture a bit with all the hard work you did in previous sections. In this section, you are going to setup the extends from the template in the templates repository.
- Create a new repository in your Version Control System, in this example it will be Azure Repos and is called az-role-assigner
- Create the folder cicd which will store the azure-pipelines.yml file
- Now create a
resourcesthat targets the templates repository as identifier
resources:
  repositories:
    - repository: templates
      type: git
      name: templates
ref: master- Add the
extendsthat references the azure-rbac-powershell-template-stage.yml template
extends:
template: /templates/az/rbac/stage/azure-rbac-powershell-template-stage.yml@templates- Under the template, add the following parameter to start targeting the test environment
extends:
  template: /templates/az/rbac/stage/azure-rbac-powershell-template-stage.yml@templates
  parameters:
      environments:
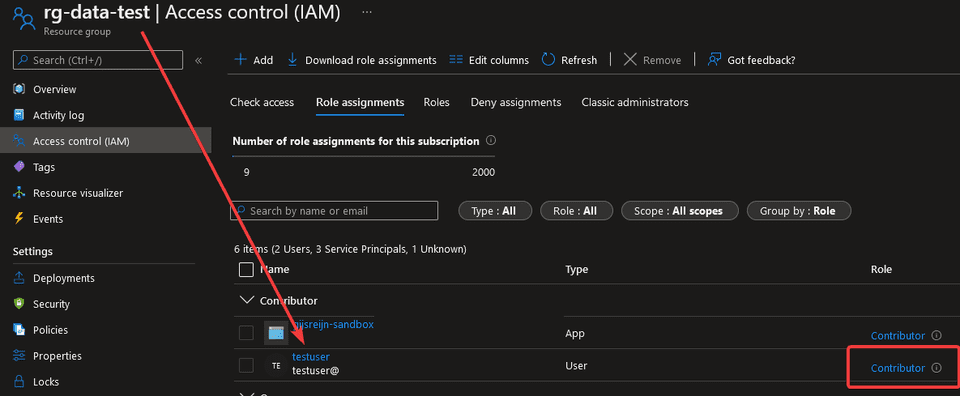
- name: test- Go to the Azure Portal to find the objectId, scope and definition that you want to target. In this example, a fake user was added to Azure Active Directory and given the Contributor permissions. Make sure that the objectId and subscriptionId is filled in with your values
extends:
  template: /templates/az/rbac/stage/azure-rbac-powershell-template-stage.yml@templates
  parameters:
    environments:
      - name: test
    taskConfiguration:
      - roleAssigner: 'New'
        objectId: '<objectId>'
        scope: '/subscriptions/<subscriptionId>/resourceGroups/rg-data'
        roleDefinitionName: Contributor
azureSubscription: azdo-sp- Run the pipeline and see the results
- Go to the Azure Portal and see the results on the rg-data-test Resource Group
That was awesome! With just a few simple lines, you are re-using the templates, and dynamically building up the stage. If you want, you can also add an additional line in the environments parameter to target qa!
But how can you make sure that the pipelines adhere now to these templates? Let’s move by adding a Required template as check.
Adding required template
- In your Azure DevOps project, go to Project settings
- Go to Service connections
- Find your Service connections that were populated when you prepared for the environment and select azdo-sp-test
- Click on one of the Service connections and click the three dots on the right and select Approvals and checks
- Click See all and select Required template
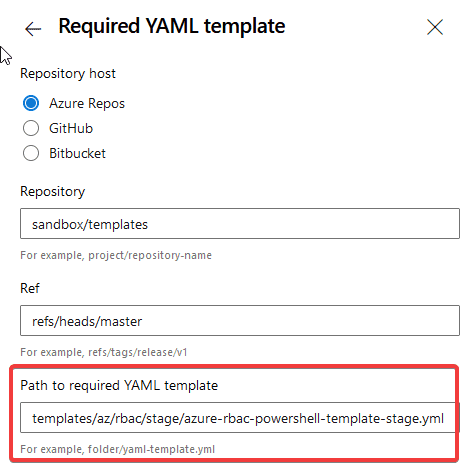
- Click the plus symbol and add the following values depending on your project
- Save the results
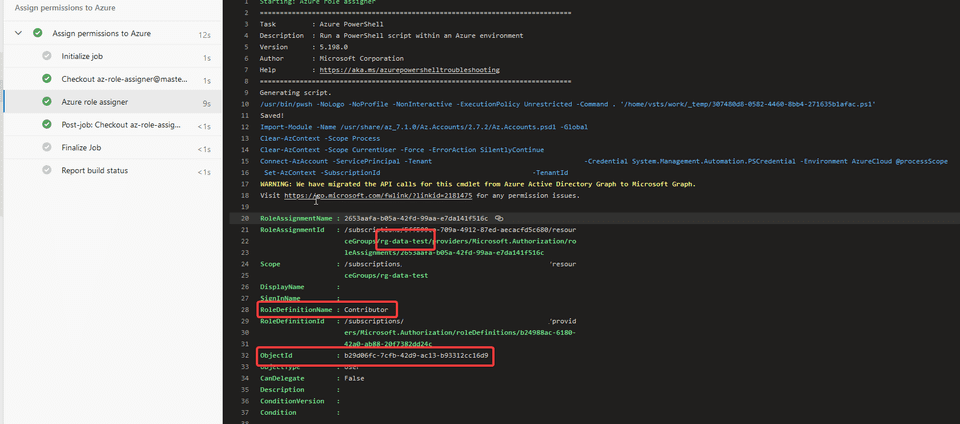
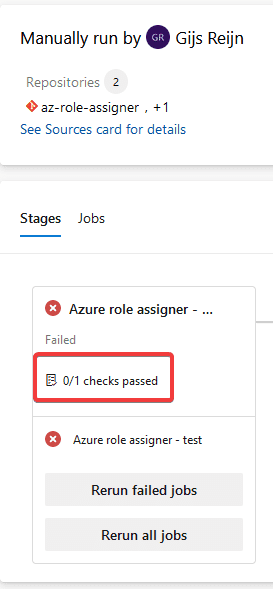
- Back on your pipeline, try out a run, which will fail
Cool, you at least know that the check is working accordingly, but why is this the case? When adding the resources, a name was specified that does not match the one that was specified in the Required template. So let’s update the name and see if it works.
- Open the azure-pipelines.yml and instead of name: templates, update it with
<projectname>/templates, in this case the project is sandbox
resources:
  repositories:
    - repository: templates
      type: git
      name: sandbox/templates
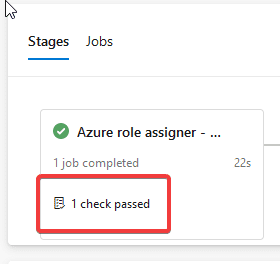
ref: master- Run the pipeline once more, and it should succeed now
The basis is now setup, and you can adjust the values inside the pipeline to target different objects, scopes and definitions.
Conclusion
It was some advanced stuff you went through, but if you managed this far, you have successfully created templates in your repository that can be shared amongst yourself and team members. You can now dynamically assign Azure role assignments through a pipeline which is secured by using templates.
In the next part, we’ll be covering how you can add dynamic cmdlets to run through the pipeline, as we’ve focussed now mainly on the New-AzRoleAssignment and Remove-AzRoleAssignment cmdlet with only three parameters. Even that both cmdlets have more parameters, there are also a lot more cmdlets that can set certain access, say for example the Set-AzKeyVaultAccessPolicy cmdlet. We also haven’t fully covered the traceability through Azure DevOps, so stay tuned for next part!
While the resources that where created during this tutorial don’t cost money depending if you’ve added additional resources to it, it is always good to cleanup after a tutorial. You can run the below script to remove all the resources.
# Variables
$PAT = '<patToken>'
$SubscriptionId = '<subscriptionId'
$ProjectName = '<projectName>'
$AzDoAccount = '<azdoAccount>'

# Connect to Azure
Connect-AzAccount -Subscription $SubscriptionId
$Context = Get-AzContext

# Connect VSTeam module
Set-VSTeamAccount -Account $AzDoAccount -PersonalAccessToken $PAT

# Create the resources in Azure and Azure DevOps
$Environments = @('test', 'qa', 'prod')
foreach ($Environment in $Environments) {
    $ResourceGroup = Remove-AzResourceGroup -Name "rg-data-$Environment" -Location westeurope
    Get-AzADServicePrincipal -DisplayName sp-azdo-connection-$Environment | Remove-AzADServicePrincipal
    Get-VSTeamServiceEndpoint -ProjectName $ProjectName | Where-Object {$_.Name -like "*azdo-sp*"} | Remove-VSTeamServiceEndpoint
}

