When working in multiple teams, it might become quite difficult to follow code styling rules for your Powershell modules that you publish to your fellow engineers. How can you make sure that the team adheres to “code style” rules? Is it possible to protect your main branch before releasing your professional Powershell scripts? In this blog, you are going to look how you can setup code style rules for scripts that you develop.
Code style rules can become quite important, especially when you are developing for a broad range of engineers, or even open-source projects. Think of the CmdletBinding attribute in the beginning of your function. Maybe you want to have the Begin, Process and End blocks included. Is it even possible to “parse” the script itself?
With Pester, you’ll be able to create code style rules quite easily, so let’s jump in the the tutorial and see how you can achieve building code style rules!
Prerequisites
Before you continue further, there are some pre-requisites needed if you want to follow this tutorial:
- A Azure DevOps account
- A code editor like Visual Studio (VSCode)
- Any version of Pester v5 or above will do
Creating code style rules
Let’s assume that you are creating a function that retrieves the computer details through the Win32_OperatingSystem class from CIM.
Normally when you start writing your Powershell function, you probably add CmdletBinding attribute, you specify the Begin, Process and End, and probably some Write-Verbose messages like every good Powershell developer. A rough example would be like:
Function Get-ComputerDetail {
    [CmdletBinding()]
    [Parameter(ValueFromPipeline, Mandatory)]
    [ValidateNotNullorEmpty()]
    [ValidatePattern("^\w+$")]
    Param (
        [string]$ComputerName
    )

    Begin {
        Write-Verbose "Starting function $($MyInvocation.MyCommand)"
    }

    Process {
        foreach ($Computer in $ComputerName) {
            Try {
                $Params = @{
                    ClassName = 'Win32_OperatingSystem'
                    ComputerName = $Computer
                    ErrorAction = 'Stop'
                }
                $ComputerDetail = Get-CimInstance @Params
            } Catch {
                Write-Warning $_.Exception.Message
            }

            [PSCustomObject]@{
                ComputerName = $ComputerDetail.CSName
                Architecture = $ComputerDetail.OSArchitecture
            }
        }
    }

    End {
        Write-Verbose "Function ended $($MyInvocation.MyCommand)"
    }
}
But how can you make sure that other developers that are working in your repository also follow the same rules, especially with new junior developers that just started out writing script. Let’s grab the above example, and start wrapping around Pester code styling tests. Assuming that you are already working in a Git repository, make sure the following folder structure is created. In this tutorial, the powershell-code-quality is the Git repository:
Inside the Get-ComputerDetail.ps1, the example above is added. Let’s move onto writing some rules against it.
- In the tests folder, add a new file called functions.tests.ps1
- Add the following code to discovery all your .ps1 scripts that needs to be tested
BeforeDiscovery {
    $Functions = @()
    $FunctionPath = "$PSScriptRoot\..\functions\*.ps1"
    if (Test-Path $FunctionPath) {
        $Functions += Get-ChildItem -Path $FunctionPath
    }
}- Let’s first test if the
CmdletBindingattribute is added with the following code
Describe "<Function>" -Foreach $Functions {
    BeforeAll {
        # Rename the variable
        $Function = $_
    }

    Context "Styling tests" {
        It "should have <Function> 'CmdletBinding' attribute" {
            $Function | Should -FileContentMatch 'CmdletBinding'
        }
    }
}- Invoke Pester to see if the test is passing by entering
Invoke-Pester -Path testsin the console
Wonderful! You’re first test to check the script has passed and makes sure that every new function that has been introduced inside the functions folder, will be tested against this rule. Now to finish it off, let’s add some more rules!
- Still inside the functions.tests.ps1, add the following code to test the certain blocks, if the
Paramattribute is included, and Verbose block are added
It "should contain <Function> Write-Verbose blocks" {
            $Function | Should -FileContentMatch 'Write-Verbose'
        }

It "should implement <Function> 'Begin', 'Process' and 'End' blocks" {
    $Function | Should -FileContentMatch 'Begin'
    $Function | Should -FileContentMatch 'Process'
    $Function | Should -FileContentMatch 'End'
}

It "should have <Function> 'Param' attribute" {
    $Function | Should -FileContentMatch 'Param'
}
If you want to make sure these tests pass, run the
Invoke-Pester -Path testsonce more to see the results.
Now that you have 4 working tests, you are going to create a pipeline that will run if new scripts are introduced, and test against those scripts.
Setup Azure Pipeline
- In your folder structure, create a new folder called cicd and add the azure-pipelines.yml
- Install the latest version of Pester on the build agent and execute it with the
-CIparameter with the following code
The -CI parameter was introduced in version 5, if you want to check out more, check out the Pester docs for more details
jobs:
  - job:
    steps:
      - task: PowerShell@2
        displayName: 'Run code style test(s)'
        inputs:
          targetType: 'inline'
          script: |
            # Making sure latest pester version is installed
            Install-Module -Name Pester -Force -SkipPublisherCheck

            $Params = @{
              CI = $True
              Path = 'tests'
            }
Invoke-Pester @Params- Publish the NUnit report back to Azure DevOps that is generated by the
-CIparameter to see the results by adding the PublishTestResults@2 task
- task: PublishTestResults@2
  displayName: 'Publish code style test(s)'
  inputs:
    testResultsFormat: 'NUnit'
    testResultsFiles: '**/testResults.xml'
testRunTitle: 'CodeStyleTests'- Save the azure-pipelines.yml file and push it back to your repository
Assuming that you know how to setup the Azure Pipelines in Azure DevOps, you should be able to see the results as followed:
Cool, you’ve now setup the basis of your pipeline, but wouldn’t it be awesome to break the build if certain tests have not passed, or when the code coverage is below a certain threshold? Let’s proceed by adding the code coverage results and break the build if tests have not passed accordingly
Adding code coverage metrics
Code coverage is a good metric to determine the number of lines of code that was successfully validated under a testing procedure. Pester out-of-the-box supports the reporting of code coverage metrics by producing the coverage results into an XML file in JaCoCo format. So, let’s open up the azure-pipelines.yml and add parameters to produce this file.
- In your editor, open the azure-pipelines.yml and replace the code from step 2 with the following to produce both NUnitXML report with the coverage report
# Making sure latest pester version is installed
Install-Module -Name Pester -Force -SkipPublisherCheck

$Configuration = New-PesterConfiguration
$Configuration.CodeCoverage.Enabled = $True
$Configuration.CodeCoverage.Path = 'functions'
$Configuration.CodeCoverage.OutputFormat = 'JaCoCo'
$Container = New-PesterContainer -Path tests
$Configuration.TestResult.Enabled = $true
$Configuration.TestResult.OutputFormat = 'NUnitXml'

Invoke-Pester -Configuration $Configuration- After the PublishTestResults@2 task include the PublishCodeCoverageResults@1 task to publish back the coverage report
- task: PublishCodeCoverageResults@1
  displayName: 'Publish code coverage report'
  inputs:
    codeCoverageTool: 'JaCoCo'
    summaryFileLocation: '**/coverage.xml'
pathToSources: '$(System.DefaultWorkingDirectory)'- Let’s also make sure that if any tests fail, the pipeline will fail, so in your PublishTestResults@2 task include the
failedTaskOnFailedTestsvalue to true
- task: PublishTestResults@2
  displayName: 'Publish code style test(s)'
  inputs:
    testResultsFormat: 'NUnit'
    testResultsFiles: '**/testResults.xml'
    failTaskOnFailedTests: true
testRunTitle: 'CodeStyleTests'- Save the file and push back the changes to the repository
The pipeline should have been triggered and you should see that under the unit test report, the code coverage report has now been added.
The last step to the pipeline, is adding a threshold on the code coverage, so you’ll be able to add it later as validation
Build quality checks
Build Quality Checks task allows you to add quality gates to the pipeline. To move along with this step, make sure that the task is installed in your Azure DevOps organization.
- Still in your editor, open the azure-pipelines.yml and add the following code to check the lines and a certain threshold to break the process
- task: BuildQualityChecks@8
  displayName: 'Add quality gate'
  inputs:
    checkCoverage: true
    coverageFailOption: 'fixed'
    coverageType: 'lines'
coverageThreshold: '60'- Commit the file, and you should now see that the pipeline has been broken if the build has finished
For now, leave the pipeline broken and move a long to setup the branch policies.
Setup branch policy and status validation
If you’ve followed along, you should have successfully setup your pipeline to include the unit test report and the code coverage report including quality check. But how can you now protect your precious branch master or main where you potentially release your scripts from? Here you will learn to add a build validation branch policy to enforce build validation standards and you will add Status Check to validate the status of code coverage.
Setting up branch policy
- In your Azure DevOps account, go to Azure Repos and select Branches
- Select master or main branch depending on your default branch creation, click the three dots on the right and select branch policy
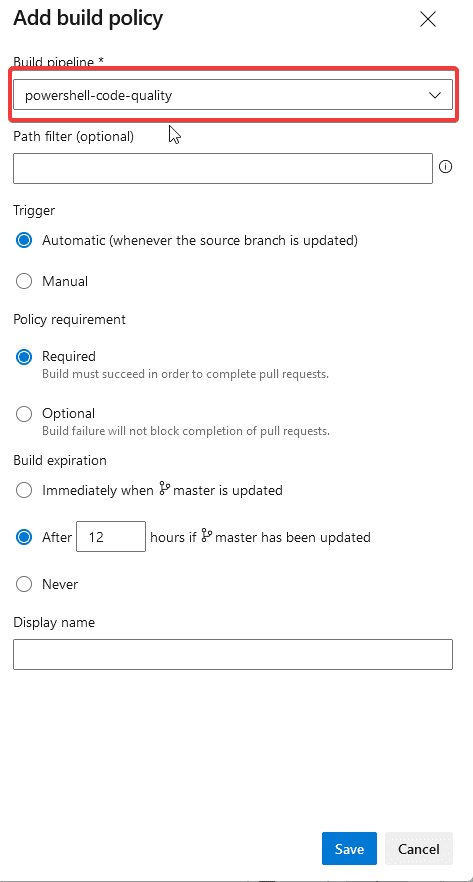
- Click the + icon on the Build Validation
- In the dropdown of Build pipeline, add your build pipeline (in this example it will be powershell-code-quality)
- Keep the defaults and click Save
Now your master or main branch is protected with build validation.
Status Check validation
Code coverage for pull request under the branch policies is supported, but unfortunately during the time of writing, it is only supported for .NET and .NET core. Nevertheless, you should have added the BuildQualityChecks@8 task which can report back the status also.
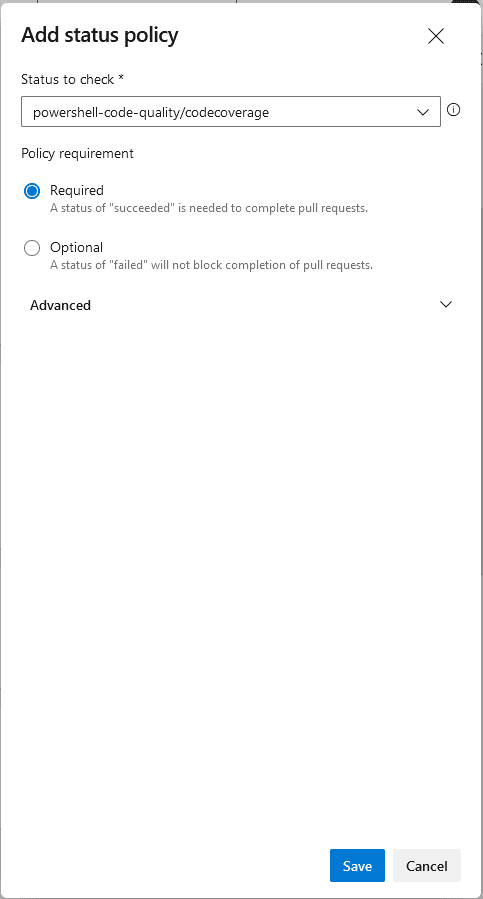
- Back on your branch policy, click the + Icon on Status Checks
- In the dropbox, type in powershell-code-quality/codecoverage and click Save
Great, the branch policies are now in-place, but now the code coverage should be above the 60%. Let’s add a simple unit test to test the Get-ComputerDetail function and pass the coverage threshold.
Adding unit test for Get-ComputerDetail function
- In your editor, under the tests folder, add a file called Get-ComputerDetail.tests.ps1
- Add the following Powershell code to test if the function returns any value
Describe "Get-ComputerDetail" {
    BeforeAll {
        . $PSScriptRoot\..\functions\Get-ComputerDetail.ps1
    }
    It "Returns computer details" {
        Get-ComputerDetail | Should -Not -BeNull
    }
}- Open the azure-pipelines.yml file, add the following code to not apply a trigger as you’re already having a Build Validation check when creating a Pull Request
# No CI trigger as were validating through pull requests
trigger: none- Create a new branch to commit your new test and pipeline
git checkout -b development/pr-test;
git add .;
git commit -m "PR Test";
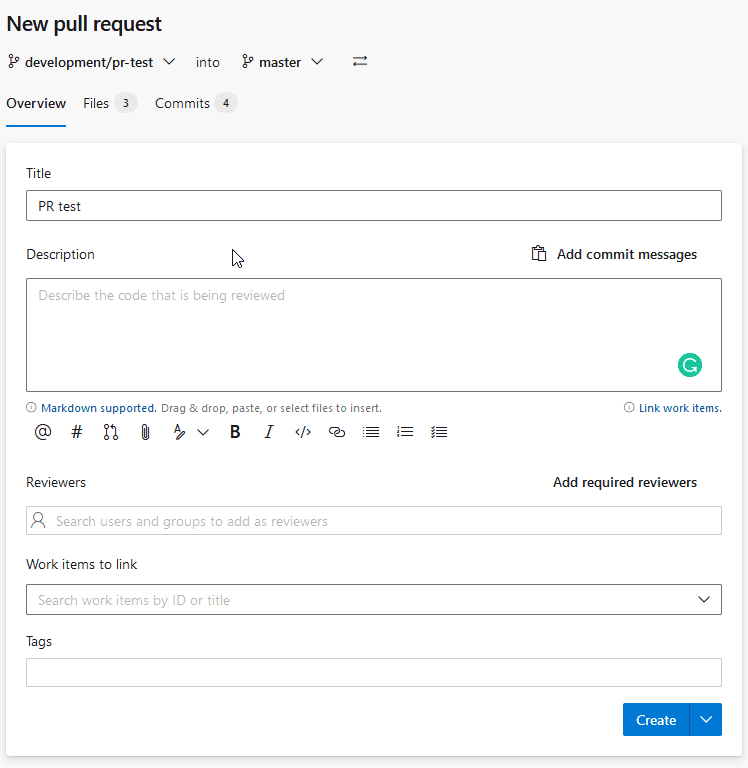
git push origin development/pr-test;"`- Back in Azure DevOps, you’ll notice that a new pull request can be merged into main or master
- Click on Create a pull request and pull the changes into main or master, in this example it is master
- Once created, you’ll see that the Build Valdation and Status Check is being executed
Once finished, you can see that the validations have succeeded and you can complete the pull request. Sweet!
Conclusion
It was some configuration work that you did, but now you’ve successfully introduced some code styling standards to your Powershell scripts. You’ve also included a simple unit test to pass the code coverage threshold. So what are you going to do now? Are you going to add some more tests, for example testing if Help has been added to your functions? Maybe you can check if new parameters have been introduced, depending on the old ones. There is always more to add…


