- Prerequisites
- Creating SQL Server Agent job
- Setting up build automation script
- Deploying database package
- Conclusion
- Special thanks to
Database automation helps complex and time consuming tasks to be repetitive and simple across environments. Many times, database administrators are responsible for provisioning and configuring SQL Server objects like SQL Server Agent jobs, triggers, security, functions and even tables that are outside the Software Development Lifecycle of the database on each environment in a traceable manner.
The question therefore is, which tooling does have these capabilities to deploy SQL Server objects in such a fashion? This tutorial dives into setting up Database Automation for at least your SQL Server Agent jobs, but can also be used for other objects mentioned, with Azure DevOps and Powershell.
Prerequisites
Before you start, the tutorial assumes that you have the following already in-place:
- An Azure DevOps account
- A code editor like Visual Studio (VSCode)
- A Azure (Git) Repo, in this example it will be dbops
-
The following Powershell modules
- dbops with version 0.7+
- InvokeBuild with version 5.9+
- SQL Server 2016+ installed
Creating SQL Server Agent job
Before jumping right into the tutorial, you’ll at least need a SQL script that is going to deploy a SQL Server Agent job to your instance.
- Open your favorite editor with your repository checked out
- Create a new folder called scripts, inside the scripts, add another folder called jobs where you’ll store all the SQL Server Agent jobs
- Create a file called 0001_dba_cycle_errorlog.sql
It’s always a good practice to follow naming conventions for your SQL scripts you want to deploy amongst your team members
- Add the following content to create a job that recycles the error log when the size is over 50MB
Declare @jobexists bit
IF EXISTS (SELECT job_id FROM msdb.dbo.sysjobs_view WHERE name = N'DBA: Cycle Errorlog')
BEGIN
	Set @jobexists = 1
	GOTO EndSave
END

DECLARE @ReturnCode INT, @ServerName varchar(100)
SELECT @ReturnCode = 0, @ServerName = @@Servername

IF NOT EXISTS (SELECT name FROM msdb.dbo.syscategories WHERE name=N'Database Maintenance' AND category_class=1)
BEGIN
	EXEC @ReturnCode = msdb.dbo.sp_add_category @class=N'JOB', @name=N'Database Maintenance'
	IF (@@ERROR <> 0 OR @ReturnCode <> 0) GOTO QuitWithRollback
END


BEGIN TRANSACTION
DECLARE @jobId BINARY(16)
EXEC @ReturnCode =  msdb.dbo.sp_add_job @job_name=N'DBA: Cycle Errorlog',
		@enabled=1,
		@notify_level_eventlog=0,
		@notify_level_email=0,
		@notify_level_netsend=0,
		@notify_level_page=0,
		@delete_level=0,
		@description=N'Cycles Errorlog when its size is over 50MB or its age over 30 days.',
		@category_name=N'Database Maintenance',
		@owner_login_name=N'sa',
		@job_id = @jobId OUTPUT
IF (@@ERROR <> 0 OR @ReturnCode <> 0) GOTO QuitWithRollback

EXEC @ReturnCode = msdb.dbo.sp_add_jobstep @job_id=@jobId, @step_name=N'Adaptive Cycle Errorlog',
		@step_id=1,
		@cmdexec_success_code=0,
		@on_success_action=1,
		@on_success_step_id=0,
		@on_fail_action=2,
		@on_fail_step_id=0,
		@retry_attempts=0,
		@retry_interval=0,
		@os_run_priority=0, @subsystem=N'TSQL',
		@command=N'SET NOCOUNT ON;
DECLARE @CycleMessage VARCHAR(255), @return_value int, @Output VARCHAR(32)
DECLARE @ErrorLogs TABLE (ArchiveNumber tinyint, DateCreated DATETIME, LogFileSizeBytes int)
INSERT into @ErrorLogs (ArchiveNumber, DateCreated, LogFileSizeBytes )
EXEC master.dbo.sp_enumerrorlogs
SELECT @CycleMessage = ''Current SQL Server ErrorLog was created on '' + CONVERT(VARCHAR, DateCreated , 105) + '' and is using '' +
CASE WHEN LogFileSizeBytes BETWEEN 1024 AND 1048575 THEN CAST(LogFileSizeBytes/1024 AS VARCHAR(10)) + '' KB.''
WHEN LogFileSizeBytes > 1048575 THEN CAST((LogFileSizeBytes/1024)/1024 AS VARCHAR(10)) + '' MB.''
ELSE CAST(LogFileSizeBytes AS VARCHAR(4)) + '' Bytes.''
END
+ CASE WHEN LogFileSizeBytes > 52428800 THEN '' The ErrorLog will be cycled because of its size.'' -- over 50MB
WHEN DateCreated <= DATEADD(dd, -30,GETDATE()) THEN '' The ErrorLog will be cycled because of its age.'' -- over 30 days
ELSE '' The ErrorLog will not be cycled.'' end
FROM @ErrorLogs where ArchiveNumber = 1
PRINT @CycleMessage
IF @CycleMessage LIKE ''%will now be cycled%''
BEGIN
	EXEC @return_value = sp_cycle_errorlog
	SELECT @Output = CASE WHEN @return_value = 0 THEN ''ErrorLog was sucessfully cycled.'' ELSE ''Failure cycling Errorlog.'' END
	PRINT @Output
END',
		@database_name=N'master',
		@flags=4
IF (@@ERROR <> 0 OR @ReturnCode <> 0) GOTO QuitWithRollback
EXEC @ReturnCode = msdb.dbo.sp_update_job @job_id = @jobId, @start_step_id = 1
IF (@@ERROR <> 0 OR @ReturnCode <> 0) GOTO QuitWithRollback
EXEC @ReturnCode = msdb.dbo.sp_add_jobschedule @job_id=@jobId, @name=N'DBA: Cycle Errorlog',
		@enabled=1,
		@freq_type=4,
		@freq_interval=1,
		@freq_subday_type=1,
		@freq_subday_interval=0,
		@freq_relative_interval=0,
		@freq_recurrence_factor=0,
		@active_start_date=20120529,
		@active_end_date=99991231,
		@active_start_time=235900,
		@active_end_time=235959
IF (@@ERROR <> 0 OR @ReturnCode <> 0) GOTO QuitWithRollback
EXEC @ReturnCode = msdb.dbo.sp_add_jobserver @job_id = @jobId, @server_name = @ServerName
IF (@@ERROR <> 0 OR @ReturnCode <> 0) GOTO QuitWithRollback
COMMIT TRANSACTION
GOTO EndSave
QuitWithRollback:
    IF (@@TRANCOUNT > 0) ROLLBACK TRANSACTION
EndSave:
If @jobexists = 1
	Print 'Job DBA: Cycle Errorlog exists, so skipping'
GO
Nice! You now have something to work with and can be deployed through the environments you have. Let’s move on by jumping into some build automation with the InvokeBuild module.
Setting up build automation script
Build automation scripts are used as first step toward automating builds. These scripts can come in all shapes and sizes, but in this example you’ll be using Powershell to describe the process that combine some techniques, and later used in Azure DevOps to kick of the process just as you would in your editor. So let’s dive into exploring the InvokeBuild module.
- In the root of your repository, create a file called .build.ps1 as this will make sure the Invoke-Build cmdlet will automatically pick up when called from the terminal
- Open the file and add the following content
[CmdletBinding()]
Param (
    $PackagePath = "$BuildRoot\Package\sqldba.zip",
    $ScriptPath = "$BuildRoot\scripts\",
    $Version = '1.0'
)

task CreatePackage {
    $PackageDirectory = Split-Path $PackagePath -Parent
    Write-Build Yellow $PackageDirectory
    if (-not (Test-Path $PackageDirectory)) {
        Write-Build Yellow "Creating package directory: $PackageDirectory"
        New-Item -Path $PackageDirectory -ItemType Directory
    }
    Write-Build Yellow "Creating new package"
    $Package = Invoke-DboPackageCI -Path $PackagePath -ScriptPath $ScriptPath -Version $Version -WarningVariable Warning
}
So what happens here? Let’s go over it one-by-one:
-
The param block specifies three parameters that can be passed
- PackagePath: The package path to drop the created package to
- ScriptPath: The script path to scan the folders and recursively add files to be packed
- Version: The string that indended to represent major/minor versions of the package
- The CreatePackage task which runs the Invoke-DboPackageCI cmdlet from the dbops module
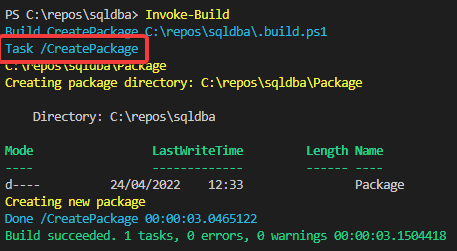
Now when you are still in your editor, open up a Powershell terminal session to see it in action by using the Invoke-Build cmdlet to invoke the build.
You can use the Get-DBOPackage cmdlet to see the content of the package including the version number that is incremented automatically.
The build works locally, and the script that was created earlier, is added to the package. Sweet, let’s continue!
Creating the build pipeline
In this section, the first part of the pipeline is going to be setup. Let’s create a build stage.
- Add a new folder in the root of your project called cicd and inside the folder, create a file called azure-pipelines.yml which is the YAML file that represents your pipeline
- Add the following content to create the package, but this time specify a different PackagePath
stages:
  - stage: 'Build'
    displayName: 'Build package'
    jobs:
      - job:
        steps:
            - powershell: |
                Install-Module -Name InvokeBuild, dbops -Scope CurrentUser -Force

                Invoke-Build -PackagePath '$(Build.ArtifactStagingDirectory)\$(Build.DefinitionName).zip'
displayName: 'Create package'- Commit the changes to Azure Repos and make sure that you import the pipeline
If you don’t want the Package folder to be included in your Azure Repos, make sure you add it to the .gitignore file
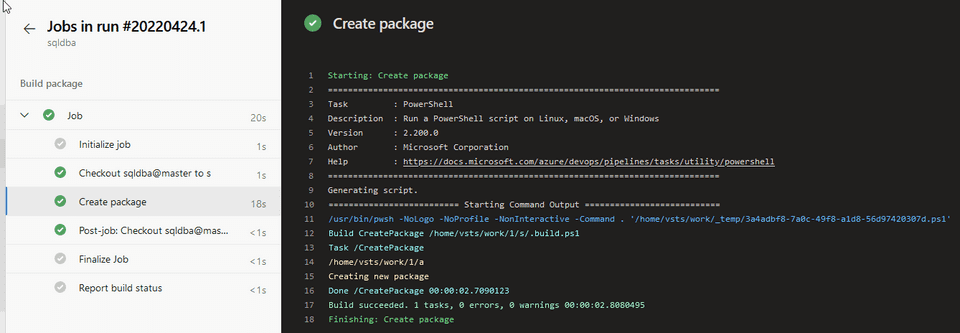
If you have imported the pipeline, you should have similar results in the run below.
Applying versioning
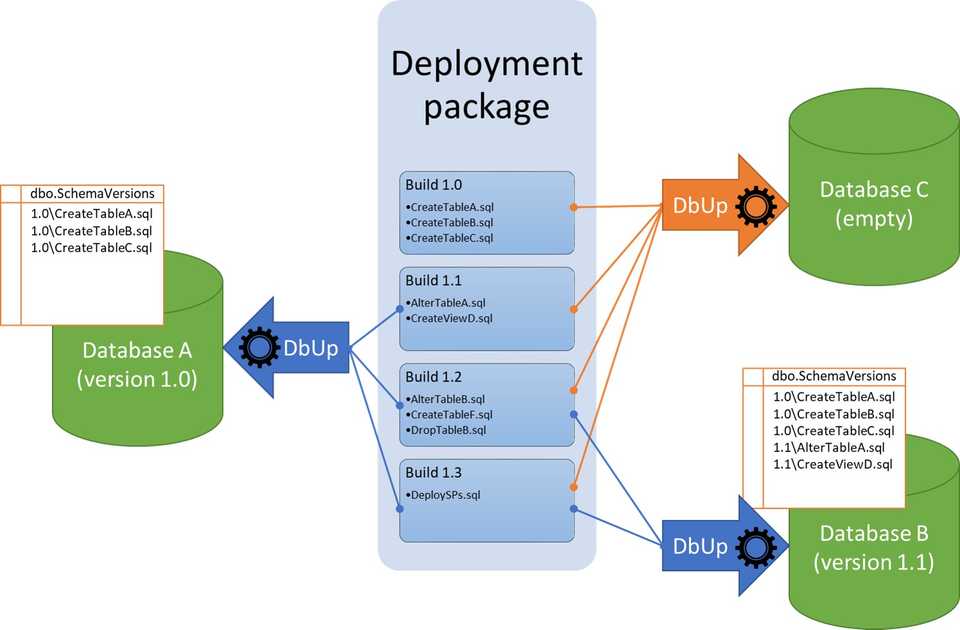
A proper versioning strategy allows you to identify each build artifact quickly and easily. In this tutorial, the Semantic Versioning is adopted as versioning strategy. You might already have fooled a bit locally to see what happens when a new file is introduced, but to give you a high overview what is happening, you can see the following picture which was taken with love from the dbops Github page.
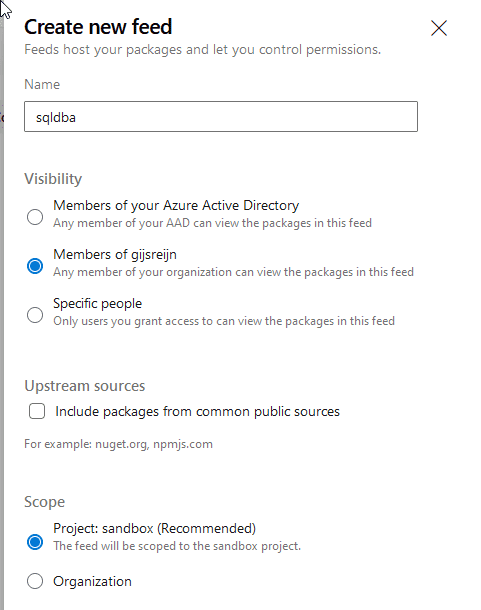
This tutorial will use the Azure Artifacts as Package management source to introduce new versions, which later can be deployed incrementally. Firstly, before applying the version through the Azure Pipelines, create a new feed in the Azure Artifacts.
- In your Azure DevOps project, click Artifacts and click on Create Feed
- Provide a feed name, in this example sqldba, and leave the defaults
- In the .build.ps1 script, add the following content to set a custom variable which can be checked as condition, set the build number with the version from the package that is created during the build, and set the package directory
[CmdletBinding()]
Param (
    $PackagePath = "$BuildRoot\Package\sqldba.zip",
    $ScriptPath = "$BuildRoot\scripts\",
    $Version = '1.0'
)

task CreatePackage {
    $PackageDirectory = Split-Path $PackagePath -Parent
    Write-Build Yellow $PackageDirectory
    if (-not (Test-Path $PackageDirectory)) {
        Write-Build Yellow "Creating package directory: $PackageDirectory"
        New-Item -Path $PackageDirectory -ItemType Directory
    }
    Write-Build Yellow "Creating new package"
    $Package = Invoke-DboPackageCI -Path $PackagePath -ScriptPath $ScriptPath -Version $Version -WarningVariable Warning

    if ($Env:TF_BUILD) {
        Write-Build Yellow "Building through Azure DevOps"
        if ($Warning.Message -eq 'No scripts have been selected, the original file is unchanged.') {
            Write-Build Yellow "Publishing step will be skipped as nothing has changed"
            Write-Host "##vso[task.setvariable variable=Modified]No"
        } else {
            Write-Build Yellow "Publishing step will be turned on as there are changes"
            Write-Host "##vso[task.setvariable variable=Modified]Yes"
        }

        $Version = $Package | select -ExpandProperty version -Last 1
        Write-Host "##vso[build.updatebuildnumber]$Version"

        Write-Build Yellow "Setting publish directory variable to: $($Package.FullName)"
        Write-Host "##vso[task.setvariable variable=PackageDirectory]$($Package.FullName)"
    }
}
Make sure that you have committed the build script before adding the tasks below
- Go back to the pipeline you have imported and add the Universal packages download task just above the Powershell task
The GUIDs that the YAML editor produces are different for each project, therefore not added as YAML code in the tutorial
- For the Universal packages download task make sure that
continueOnError: trueis added as in the initial setup there is no package in the Artifacts - Add the Universal packages publish task after the Powershell task with the following
condition: and(succeeded(), eq(variables['Modified'], 'Yes'))condition on it
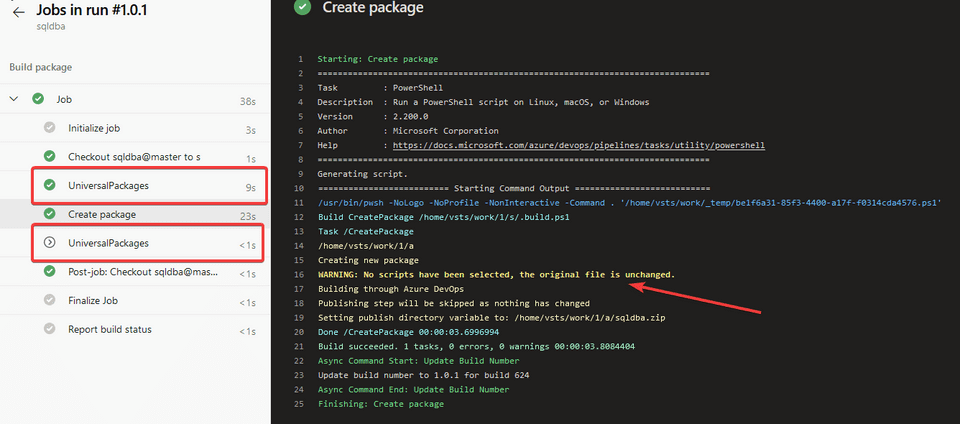
Make sure that the build has run once. You’ll notice that an error is thrown the first time, but the build is still succeeding.
If you try it once more, you can see that the download task is now succeeding, yet the publish task is skipped. Also you notice that there are no changes in the Powershell task, thus staying the same version.
This is neath, you have applied some appropriate versioning!
Deploying database package
It is now time to deploy the package to your environment. From the prerequisites, you’ve probably have a SQL server box available locally to test the deployment. In this tutorial, the environment syntax is used, building further on the YAML based pipeline. It is of course also possible to use deployment agents regardless, only you need to create a classic pipeline for it. Nevertheless, the same tasks apply here and you should be able to drag them in here, the same way you do in YAML. Anyway, let’s expand the YAML pipeline, as YAML is the way to go!
- In your code editor, open up the azure-pipelines.yml
- Add the following content to target your specific environment, replace the TARGETNAME and TARGETTAGS with the environment you have available
- stage: 'Deploy'
    dependsOn: 'Build'
    displayName: 'Deploy package'
    jobs:
      - deployment:
        environment:
          name: <TARGETNAME>
          resourceType: VirtualMachine
          tags: <TARGETTAGS>
        strategy:
          runOnce:
            deploy:
steps:- Add the following tasks to download the package from the Azure Artifacts, extract it and execute the deploy.ps1 script. Make sure that you have adjusted the VSTSFEED and VSTSPACKAGE with the values that get populated when you add the task through the YAML editor
- task: UniversalPackages@0
  displayName: 'Download package from Azure Artifacts'
    inputs:
    command: 'download'
    downloadDirectory: '$(Build.DefinitionName).zip'
    feedsToUse: 'internal'
    vstsFeed: '<VSTSFEED>'
    vstsFeedPackage: '<VSTSPACKAGE>'
    vstsPackageVersion: '$(Build.BuildNumber)'

    - task: ExtractFiles@1
      displayName: 'Extract zip file'
        inputs:
        archiveFilePatterns: '**/*.zip'
        destinationFolder: '$(System.DefaultWorkingDirectory)'
        cleanDestinationFolder: false
        overwriteExistingFiles: true

    - powershell: |
        & "$(System.DefaultWorkingDirectory)\deploy.ps1" -SqlInstance localhost
      displayName: 'Deploy package'
Why is the deploy.ps1 script being used, and not the Install-DBOPackage cmdlet from the dbops module? As you might have noticed when building the package, modules are installed on the agent you run it under. In some high security environments, it might not always be possible to install Powershell modules locally. The dbops module is smart enough to pack in the necessary modules to deploy the package and when it is run with the deploy script, it imports the required modules to run. If you have cracked open the package itself, you’ll see it by yourself.
This reduces also the necessity to re-install the modules on each environment, which might cost some additional time for the agents.
- When the changes are made, save it and commit it which should trigger the pipeline
Always make sure that the agent account has sufficient permissions to run your scripts on the deployed environments
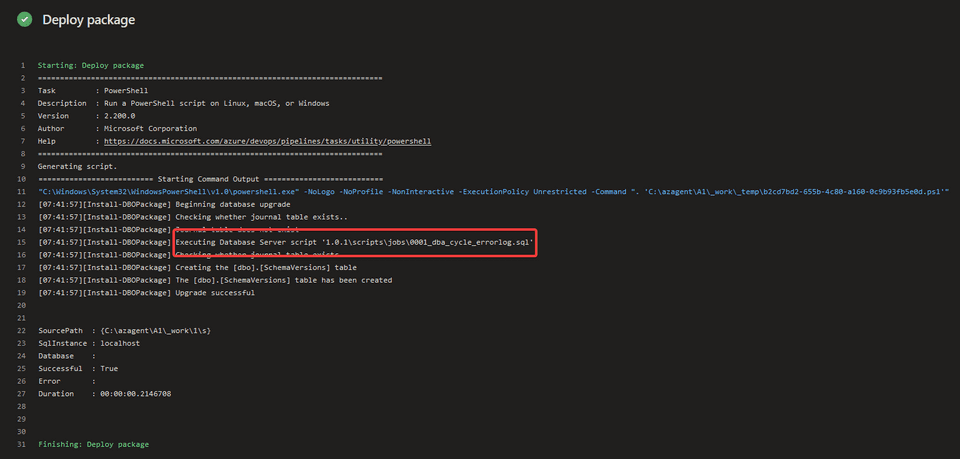
When the pipeline has finished running, you’ll notice that the script has executed successfully.
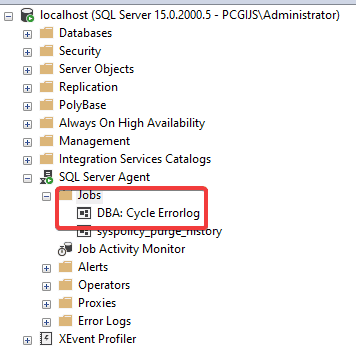
If you have opened up the instance with SQL Server Management Studio, the job is created!
You can check out in the dbo.SchemaVersions table, which is a table that is automatically populated in the master table to track the scripts that have ran by executing the following script on your instance.
SELECT [Id]
      ,[ScriptName]
      ,[Applied]
      ,[Checksum]
      ,[AppliedBy]
      ,[ExecutionTime]
  FROM [master].[dbo].[SchemaVersions]
Conclusion
By now, you should have successfully deployed a SQL Server object through database automation in Azure DevOps. It is now up to you to decide which environments you are going to target. Some food for thought, how are you going to notify the users when something has been deployed? How can you add release notes to your packages? Before committing the changes, how can you safely test out the scripts locally? You already have your first start of the build automation script!
Special thanks to
- The Data Platform Community for providing such amazing software which is free to use

