- Pre-requisites
- Generating markdown files by defining a document
- Generating documentation for DTAP street
- Staying up-to-date with changes in your environment
- Conclusion
Are your teams spawning Azure Virtual Machines like sandwiches going over the counter? Do you want to dynamically create an inventory of your Azure VMs and share it with your stakeholders? Do you want to identify which Azure VM belongs to which environment and department? Glad to have you here.
There are plenty of tools out there where you can inventory your Azure VMs. Think of Azure Arc, Ansible, maybe you are using Windows Admin Center, or just looking into the Azure Portal. Not all of your stakeholders have access to these tools, but many will have access to wikis, especially in Azure DevOps. Since Azure DevOps supports the ability to store markdown files and publish them as wiki, you can easily gather all Azure VMs into a single file. Even better, when you have tags sitting on the resources, you can add these specific details to the file. In this blog, you’ll learn everything about it.
Pre-requisites
Before you continue and you want to follow along, you’re going to need some pre-requisites.
- An Azure DevOps account
- An Azure account with pre-populated Azure VMs
- A code editor like Visual Studio (VSCode) to write PowerShell scripts
- The Az PowerShell module v10.0+
If you’re all set, you can start by exploring PSDocs.
Generating markdown files by defining a document
PSDocs is a PowerShell module to generate markdown from objects using PowerShell syntax. This project is created by Microsoft and is open-source in GitHub. PSDocs allows you to provide instructions on how PSDocs renders an object that you pass into documentation. This will enable you to store those documents scripts in your VCS. The output that is generated from PSDocs, which is markdown, can also be stored in VCS. To see how it works, start by installing PSDocs on your local computer.
PS C:\> Install-Module -Name PSDocs -Repository PSGallery -Scope CurrentUserNow you have PSDocs installed locally, you can start by defining a sample document by using the Document syntax. Take the example from below.
If you want to see the available cmdlets, you can run
Get-Command -Module PSDocsin your PowerShell terminal.
Document Inventory {
    Section Inventory {
        "The below table shows the inventory of available Azure Virtual Machines"

        $InputObject | Table -Property @{ Name = 'Virtual Machine Name'; Expression = {$_.Name}; Width = 25;},
        @{Name = 'Resource Group'; Expression = {$_.ResourceGroupName.ToLower() }; Width = 25;},
        @{Name = 'Environment'; Expression = {if ($_.Tags['Environment']) {$_.Tags['Environment']} else {""} }; Width = 25;},
        @{Name = 'Project'; Expression = {if ($_.Tags['Project']) {$_.Tags['Project']} else {""} }; Width = 25;},
        @{Name = 'Department'; Expression = {if ($_.Tags['Department']) {$_.Tags['Department']} else {""} }; Width = 25;}
    }
}
You see multiple keywords being used in above example. To cover some of the keywords used:
- Document: A named block that generates the output documentation. You can define multiple document definition and call them separately by using the
-Nameparameter in `Invoke-PSDocument - Section: A section that converts into a header. The section can be nested in multiple subsections, which translates to level 2, 3 or 4 headers
- Table: Simply creates a formatted table from pipeline objects
The Table keyword allows to define the specific properties, including four additional keys. You already see the Width key used above.
Save the file as PowerShell script extension in a directory. In this example, you see me use PSDocsDemo as repository and the scripts stored in the Scripts folder.
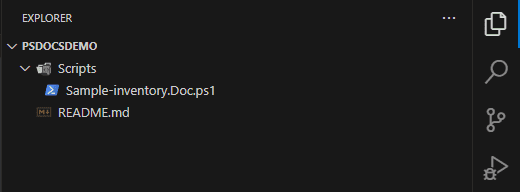
If you have the file saved, run the following PowerShell snippet. Make sure that you replace the values in the brackets corresponding to your environment.
$Server = Get-AzVm -Name <name>

Invoke-PSDocument -Path <DocumentPath> -InputObject $Server -OutputPath .
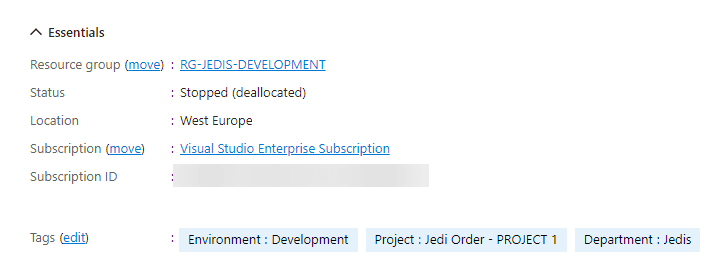
When you have set the tags listed in previous script, it generates the Inventory.md in the root of your project with the content below.
## Inventory

The below table shows the inventory of available Azure Virtual Machines

Virtual Machine Name      | Resource Group            | Environment               | Project                   | Department
--------------------      | --------------            | -----------               | -------                   | ----------
D-SVR1                      | rg-jedis-development      | Development               | Jedi Order - PROJECT 1    | Jedis
That’s pretty interesting, isn’t it? You can retrieve the information from the tags, if they are set. It can make you think about using Azure Policy to enforce a tagging strategy, which in turns help you make clean documentation on your environment.
Generating documentation for DTAP street
Many organizations have their well-known DTAP street in-place. They segregate each environment on Development, Test, Acceptance (also called QA, staging or User-Acceptance) and Production. To document each environment separately, PSDocs support using conditional statements with script blocks. Take a look at the following example.
Document Inventory {

    $Development = $InputObject | Where-Object {$_.Tags['Environment'] -eq 'Development'}
    $Test = $InputObject | Where-Object {$_.Tags['Environment'] -eq 'Test'}
    $Acceptance = $InputObject | Where-Object {$_.Tags['Environment'] -eq 'Acceptance'}
    $Production = $InputObject | Where-Object {$_.Tags['Environment'] -eq 'Production'}

    Title Introduction

    "This is the inventory list of all available Azure Virtual Machines within the Azure subscription generated by [PSDocs](https://github.com/microsoft/PSDocs)."

    Section Development -If {$null -ne $Development} {
        "In below table, you can find all the development Azure Virtual Machines servers"

        $Development | Table -Property @{ Name = 'Virtual Machine Name'; Expression = {$_.Name}; Width = 25;},
        @{Name = 'Resource Group'; Expression = {$_.ResourceGroupName.ToLower() }; Width = 25;},
        @{Name = 'Environment'; Expression = {if ($_.Tags['Environment']) {$_.Tags['Environment']} else {""} }; Width = 25;},
        @{Name = 'Project'; Expression = {if ($_.Tags['Project']) {$_.Tags['Project']} else {""} }; Width = 25;},
        @{Name = 'Department'; Expression = {if ($_.Tags['Department']) {$_.Tags['Department']} else {""} }; Width = 25;}
    }

    Section Test -If {$null -ne $Test} {
        "In below table, you can find all the test Azure Virtual Machines servers"

        $Development | Table -Property @{ Name = 'Virtual Machine Name'; Expression = {$_.Name}; Width = 25;},
        @{Name = 'Resource Group'; Expression = {$_.ResourceGroupName.ToLower() }; Width = 25;},
        @{Name = 'Environment'; Expression = {if ($_.Tags['Environment']) {$_.Tags['Environment']} else {""} }; Width = 25;},
        @{Name = 'Project'; Expression = {if ($_.Tags['Project']) {$_.Tags['Project']} else {""} }; Width = 25;},
        @{Name = 'Department'; Expression = {if ($_.Tags['Department']) {$_.Tags['Department']} else {""} }; Width = 25;}
    }

    Section Acceptance -If {$null -ne $Acceptance} {
        "In below table, you can find all the acceptance Azure Virtual Machines servers"

        $Development | Table -Property @{ Name = 'Virtual Machine Name'; Expression = {$_.Name}; Width = 25;},
        @{Name = 'Resource Group'; Expression = {$_.ResourceGroupName.ToLower() }; Width = 25;},
        @{Name = 'Environment'; Expression = {if ($_.Tags['Environment']) {$_.Tags['Environment']} else {""} }; Width = 25;},
        @{Name = 'Project'; Expression = {if ($_.Tags['Project']) {$_.Tags['Project']} else {""} }; Width = 25;},
        @{Name = 'Department'; Expression = {if ($_.Tags['Department']) {$_.Tags['Department']} else {""} }; Width = 25;}
    }

    Section Production -If {$null -ne $Production} {
        "In below table, you can find all the production Azure Virtual Machines servers"

        $Development | Table -Property @{ Name = 'Virtual Machine Name'; Expression = {$_.Name}; Width = 25;},
        @{Name = 'Resource Group'; Expression = {$_.ResourceGroupName.ToLower() }; Width = 25;},
        @{Name = 'Environment'; Expression = {if ($_.Tags['Environment']) {$_.Tags['Environment']} else {""} }; Width = 25;},
        @{Name = 'Project'; Expression = {if ($_.Tags['Project']) {$_.Tags['Project']} else {""} }; Width = 25;},
        @{Name = 'Department'; Expression = {if ($_.Tags['Department']) {$_.Tags['Department']} else {""} }; Width = 25;}
    }
}
You can see that all Azure Virtual Machines are filtered based on environment. There is an additional keyword used called Title. This represent a level 1 heading in markdown. In the section, the -If statement validates whether machines exists within the subscription. If they are not, the content will not be added. Such statements can help you evaluate your environment early on, especially when you are just building your environment and you don’t want to bother to much with documenting already. Alright, run the Invoke-PSDocument command once more to see the results.
# Introduction

This is the inventory list of all available Azure Virtual Machines within the Azure subscription generated by [PSDocs](https://github.com/microsoft/PSDocs).

## Development

In below table, you can find all the development Azure Virtual Machines servers

Virtual Machine Name      | Resource Group            | Environment               | Project                   | Department
--------------------      | --------------            | -----------               | -------                   | ----------
D-SVR1                    | rg-jedis-development      | Development               | Jedi Order - PROJECT 1    | Jedis

## Test

In below table, you can find all the test Azure Virtual Machines servers

Virtual Machine Name      | Resource Group            | Environment               | Project                   | Department
--------------------      | --------------            | -----------               | -------                   | ----------
T-SVR1                    | rg-jedis-test             | Test                      | Jedi Order - PROJECT 1    | Jedis

## Acceptance

In below table, you can find all the acceptance Azure Virtual Machines servers

Virtual Machine Name      | Resource Group            | Environment               | Project                   | Department
--------------------      | --------------            | -----------               | -------                   | ----------
A-SVR1                    | rg-jedis-acceptance       | Acceptance                | Jedi Order - PROJECT 1    | Jedis

## Production

In below table, you can find all the production Azure Virtual Machines servers

Virtual Machine Name      | Resource Group            | Environment               | Project                   | Department
--------------------      | --------------            | -----------               | -------                   | ----------
P-SVR1                    | rg-jedis-production       | Production                | Jedi Order - PROJECT 1    | Jedis
You can see how powerful it becomes, whether you have 5 VMs running or a 1000, all information is gathered and rendered as markdown. You simply have to define a document script.
Staying up-to-date with changes in your environment
Now that you have learned the basics of PSDocs, how can you stay up-to-date with environments that might change fast? Is it possible to run the script based on a schedule, and commit the results back to the repository automatically? Well, that’s where you can use Azure DevOps for. As everything is written in PowerShell, Azure Pipelines can run it! Let’s start by introducing a small wrapper script to run Invoke-PSDocument
param (
    [Parameter(Mandatory = $True)]
    [string[]]$ResourceGroupName,

    [Parameter(Mandatory=$true)]
    [string]$WorkingDir,

    [string]$OutputPath = 'docs',

    [string]$Instance = 'Inventory',

    [string]$DocTemplatePath = "Sample-inventory.Doc.ps1"
)

if (-not (Get-Module -Name PSDocs -ErrorAction SilentlyContinue)) {
  Install-Module -Name PSDocs -Force -Repository PSGallery -Scope CurrentUser
}

$VM = Get-AzVm | Where-Object {$_.ResourceGroupName -in $ResourceGroupName}

$DocTemplate = Join-Path -Path $WorkingDir -ChildPath $DocTemplatePath

Write-Host -Object ("Using - {0} to generate documentation" -f $DocTemplate)

Invoke-PSDocument -Path $DocTemplate -InputObject $VM -InstanceName $Instance -OutputPath $OutputPath
In the above script, you can specify the Resource Group(s) parameter to retrieve the Azure VMs you want. You’re gonna use the Azure PowerShell task with the subscription you have linked to the Service Connection. Keep in mind that only those Azure VMs will be able to be fetched of course.
After that, you can introduce a script that becomes responsible for pushing back the changes to your repository. You can call this script GitCommit.ps1 with the following content.
param (
    [Parameter(Mandatory = $True)]
    [string]$Branch,

    [Parameter(Mandatory = $True)]
    [string]$FileToCommit,

    [Parameter(Mandatory = $True)]
    [string]$CommitMessage
)

Write-Host -Object ("Setting up Git configuration")
git config --global user.email "AzureDevOps@somecompanyname.com"
git config --global user.name "Build Service Account"

Write-Host -Object ("Checking status")
git status

Write-Host -Object ("Checking out branch - {0}" -f $Branch)
git checkout -b $Branch

Write-Host -Object ("Adding file - {0}" -f $FileToCommit)
git add $FileToCommit

Write-Host -Object ("Commit changes")
git commit -m $CommitMessage

Write-Host -Object ("Pushing changes to - {0}" -f $Branch)
git push -u origin $Branch

git status
Lastly, you can create your Azure Pipeline YAML file. Call it for example virtualmachine-inventory-pipeline.yml that runs every Sunday on main branch.
schedules:
  - cron: '0 12 * * 0'
    displayName: Weekly Sunday build
    branches:
      include:
        - main
    always: true

jobs:
  - job: Inventory
    displayName: 'Generate Azure VM(s) inventory'
    pool:
      vmImage: windows-latest
    steps:
      - checkout: self
        persistCredentials: true
      - task: AzurePowerShell@5
        displayName: 'Generate Azure VM(s) inventory'
        inputs:
          azureSubscription: 'ServiceConnection'
          ScriptType: 'FilePath'
          ScriptPath: 'Scripts\Create-VmInventory.ps1'
          ScriptArguments: '-WorkingDir Scripts -ResourceGroupName "rg-jedis-development", "rg-jedis-test", "rg-jedis-acceptance", "rg-jedis-production" -OutputPath docs'
          errorActionPreference: 'silentlyContinue'
          azurePowerShellVersion: 'LatestVersion'
          workingDirectory: $(System.DefaultWorkingDirectory)

      - task: PowerShell@2
        displayName: 'Create new branch'
        inputs:
          filePath: '$(System.DefaultWorkingDirectory)\Scripts\GitCommit.ps1'
          arguments: '-Branch inventory -FileToCommit docs\inventory.md -CommitMessage "Automatically updated Azure Virtual Machine inventory"'
          workingDirectory: '$(System.DefaultWorkingDirectory)'
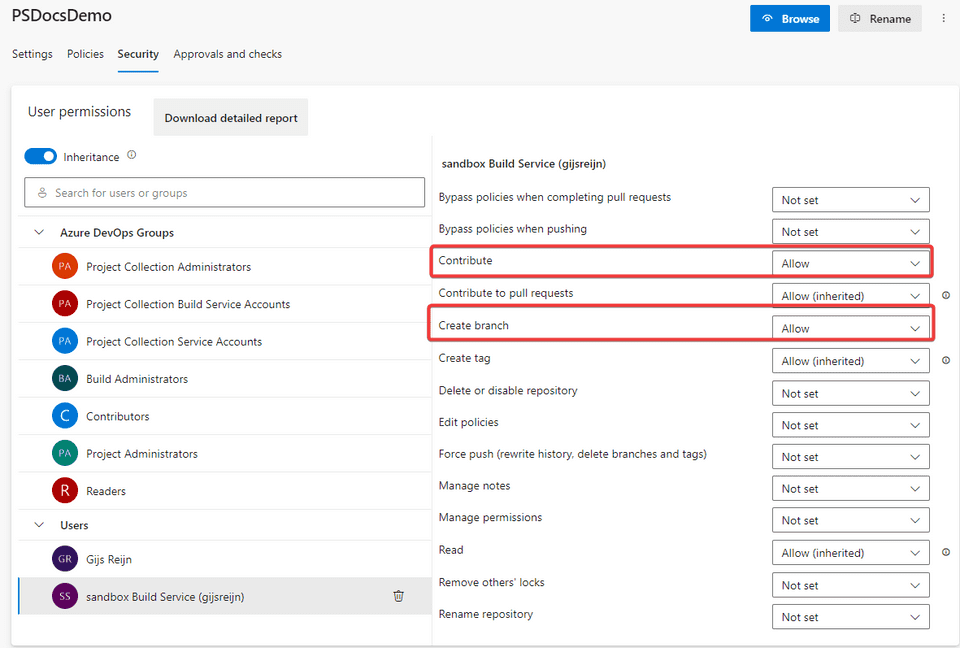
Before running the pipeline, make sure that the Build Service Account has GenericContribute and CreateBranch permissions.
When everything is set, you can run the pipeline to see the magic.
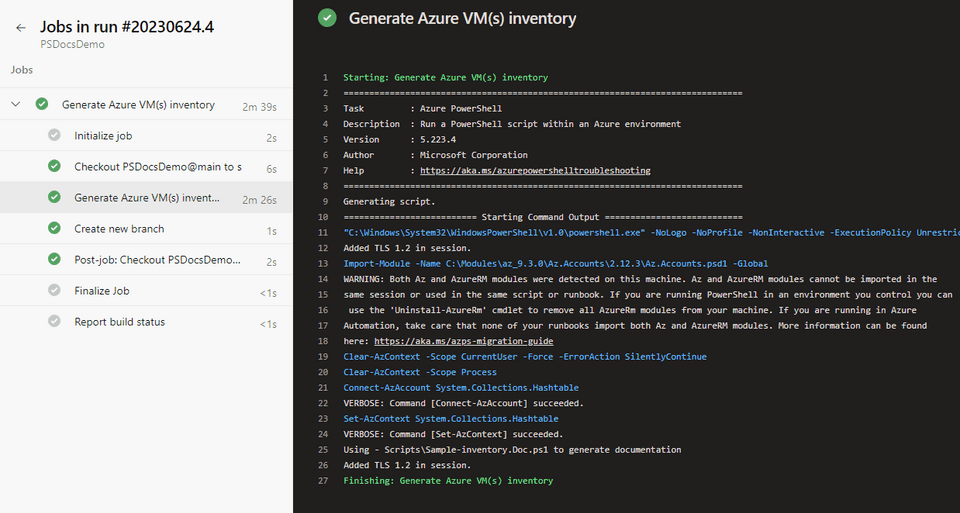
In your repository, you’ll notice that a new branch has been created with the inventory available.
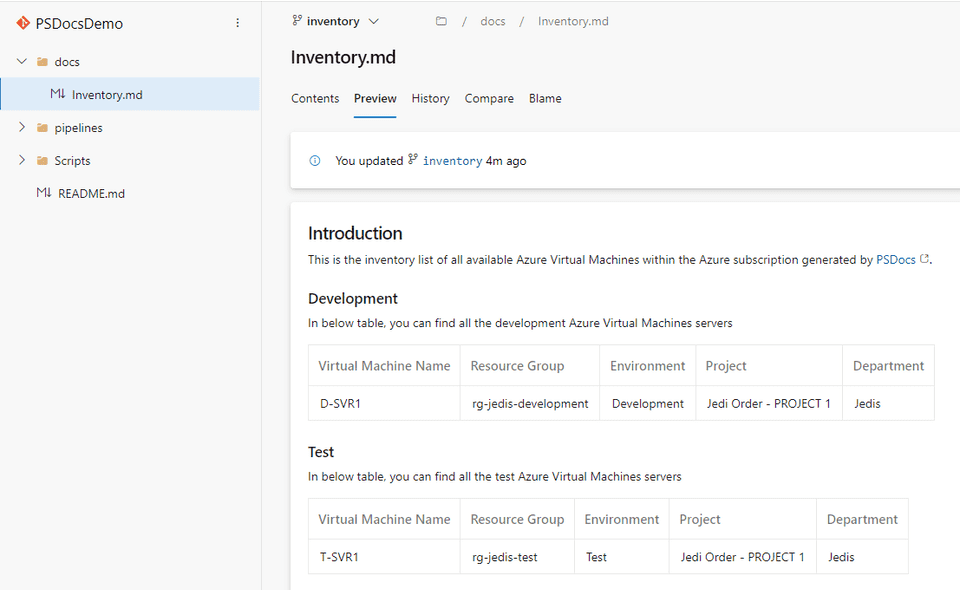
If you want, you can also create a pull request and add additional approvers so you can keep track of incoming changes directly. Now you can publish the docs section as wiki for your stakeholders to review. Pretty neath stuff!
Conclusion
PSDocs is an awesome tool to create documentation based on PowerShell objects. You can leverage the PowerShell syntax to build up the required objects, and easily transform them to markdown. The Azure DevOps wiki helps you sharing this information with relevant folks, but it also allows you to see changes that you might not have anticipated as your committing changes dynamically every Sunday.
It’s just the tip of the iceberg. Can you think of more scenario’s where you can use PowerShell to gathered the objects you want, and transform them to markdown? Are it maybe the permissions set within the Windows Server? Do you want other information stored from the Azure VMs? Bet you can think of more scenario’s. Have a good one.