SQL Server Data Tools (SSDT) is one of the modern development tools to build SQL Server databases. SSDT development is done in Visual Studio, which even in recent years have become smaller in size of the required installations needed to start developing, Microsoft have launched a new release of the SQL Database Projects extension for Azure Data Studio and VS Code. Inside this release, a new preview for an SDK-style SQL project based approach has been introduced, introducing several advantages especially for developers that ship through CI/CD pipelines or are working cross-platform.
In this tutorial series, you’ll be exploring the new SDK-style project approach. You will be setting up the project structure to prepare for CI/CD, add a build automation script to pre-test your changes before committing your changes to a repository with LocalDB, and you while be adding a composite project to run tSQLT tests, including code coverage. You have a lot to cover, so let’s get started!
Pre-requisites
Ofcourse, a lot of content is going to be covered, and for that you will be needing the following pre-requisites if you want to follow along:
- An Azure DevOps account
- A code editor like Visual Studio (VSCode) or Azure Data Studio
- A Azure (Git) Repo, in this tutorial it is called SuperHeroes
- An instance of SQL Server Express LocalDB
-
The following Powershell modules
- InvokeBuild with version 5.9+
- .NET Core runtime and SDK installed, this tutorial usages version 3.1+
Project setup
Let’s dive right into it and start setting up the project structure where your SDK-style project will live in.
In this tutorial, you’ll see me using VSCode, but it should just be applicable for Azure Data Studio
- In the Explorer, add the following structure as shown below
- Add the following content to the SuperHeroes.sqlproj file to target a SQL Server 2019 version
<?xml version="1.0" encoding="utf-8"?>
<Project DefaultTargets="Build">
  <Sdk Name="Microsoft.Build.Sql" Version="0.1.3-preview" />
  <PropertyGroup>
    <Name>SuperHeroes</Name>
    <DSP>Microsoft.Data.Tools.Schema.Sql.Sql150DatabaseSchemaProvider</DSP>
    <ModelCollation>1033, CI</ModelCollation>
  </PropertyGroup>
</Project>
You can already see that compared to existing SQL projects, it’s way smaller. Let’s add a nice schema structure inside the project folder to store the SQL objects scripts.
- Create the following folders structure in the project folder
It might be quite familiar for the experienced database developers when importing an existing project through SSDT that this structure is created. Unfortunately out-of-the-box this structure is not created when using the Database Projects extension, that’s why you create it manually to segregate it
- In the Tables folder, add a new file called SuperHeroes.sql with the following content to create a the first table
CREATE TABLE [dbo].[SuperHeroes]
(
    [Id] INT NOT NULL PRIMARY KEY,
    [Name] NVARCHAR(128) NOT NULL,
    [Rating] SMALLINT NULL
)
For now, leave the structure for what it is. You are going to test if it is building successfully.
Building the database project
To have a repetitive process of building your database project, you are going to create a build automation script that can be invoked with Invoke-Build cmdlet from the InvokeBuild module.
- In the root of your repository, create a file called .build.ps1
- Add the following content to the script
[CmdletBinding()]
Param (
    [string]$SolutionDir = "$BuildRoot\src",
    [string]$ProjectName = "SuperHeroes",
    [string]$BuildDir = "$BuildRoot\Output",
    [string]$Configuration = "Release"
)

task Clean {
    Remove-Item "$SolutionDir\$ProjectName\bin" -ErrorAction SilentlyContinue -Force -Recurse
    Remove-Item "$SolutionDir\$ProjectName\obj" -ErrorAction SilentlyContinue -Force -Recurse
    Remove-Item "$SolutionDir\Output" -ErrorAction SilentlyContinue -Force -Recurse

}

task Build {
    $Projects = @()
    $Projects += "$SolutionDir\$ProjectName\$ProjectName.sqlproj"
    $Projects | Foreach-Object {
        Write-Build Yellow "Project build: $_"
        exec {
            dotnet build $_ -c $Configuration /p:NetCoreBuild=True -o $BuildDir
        }
    }

    $Script:DacPacFile = (Resolve-Path "$BuildDir\$ProjectName.dacpac").Path
    Write-Build Yellow "DacPac path: $DacPacFile"
}

task . Clean, Build
In the parameter section, you are declaring the variables to the project setup. The $BuildRoot variable is a special variable to locate the build script location for the Invoke-Build cmdlet. The task Clean is responsible for cleaning up all relevant directories during the build process. The Build task searches for all projects in the solution directory and calls the dotnet command for building the projects. The last line of the scripts, make sure that ALL tasks are run by default that are specified.
- Open up the terminal and execute
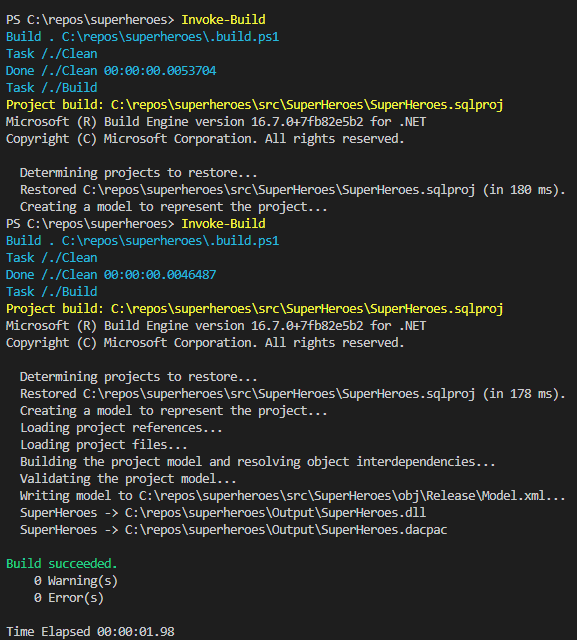
Invoke-Buildcmdlet to build the database project
As you can see, the .dacpac has been outputted to Output folder in the root of the repository. You now have a database to be deployed to an environment. For that, you are going to use the LocalDB instance to deploy!
Initiating LocalDB
LocalDB is a feature from SQL Server Express, that copies a minimal set of files necessary to run the SQL Server Database Engine. From the pre-requisites, you should already have a LocalDB installation done. In this section, you will add the tearing up and tearing down of a LocalDB instance, together with a publishing profile, to the build script. Let’s get started.
- At the top of the build script, add an additional parameter name called instance with a value of SuperHeroes
[string]$Instance = "SuperHeroes"- Add the following content in the Clean task to stop and delete the Instance when present
task Clean {
    Remove-Item "$SolutionDir\$ProjectName\bin" -ErrorAction SilentlyContinue -Force -Recurse
    Remove-Item "$SolutionDir\$ProjectName\obj" -ErrorAction SilentlyContinue -Force -Recurse
    Remove-Item $BuildDir -ErrorAction SilentlyContinue -Force -Recurse

    exec {
        $LocalDB = sqllocaldb info | Where-Object {$_ -eq $Instance}
    }

    if ($LocalDB) {
        Write-Build Yellow "Tear down: $Instance from LocalDB"
        exec {
            sqllocaldb stop $Instance
            sqllocaldb delete $Instance
        }

        $LocalDBFiles = "$Env:USERPROFILE\AppData\Local\Microsoft\Microsoft SQL Server Local DB\Instances\$Instance"
        if (Test-Path $LocalDBFiles) {
            Write-Build Yellow "Removing LocalDB files from: $LocalDBFiles"
            Remove-Item $LocalDBFiles -ErrorAction SilentlyContinue -Force -Recurse
        }
    }
}- Under the Build task, introduce a new task called Init which is responsible for initiating a new LocalDB Instance
task Init {
    Write-Build Yellow "Creating LocalDB instance: $Instance"
    exec {
        sqllocaldb create $Instance
    }
}- Make sure you add the Init task to the default run
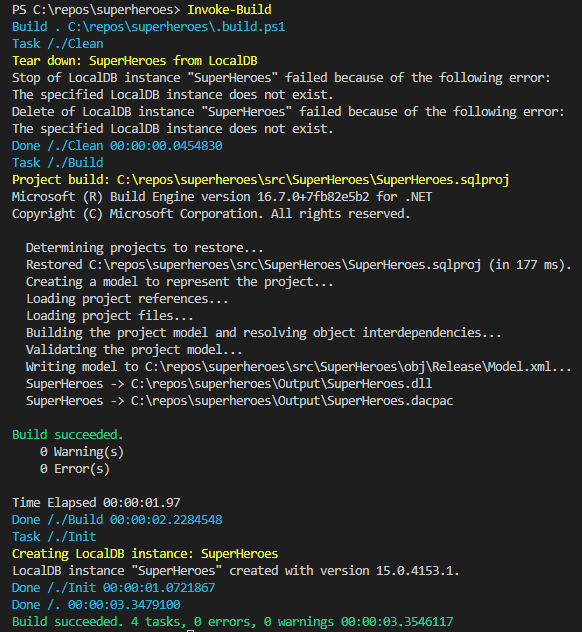
task . Clean, Build, InitRun the Invoke-Build cmdlet once to see what happens, the result will look like this the first time you run it.
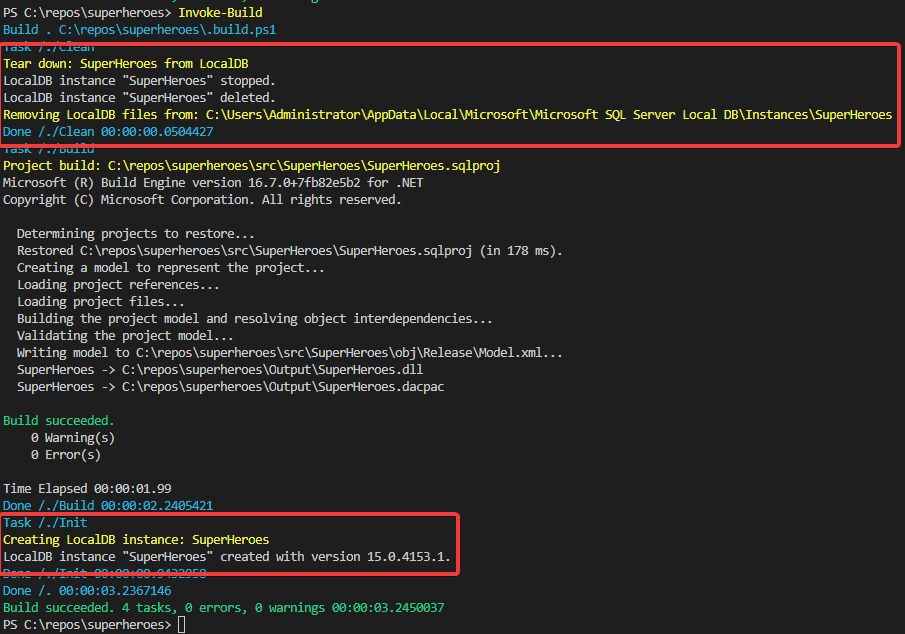
Once more run the Invoke-Build cmdlet to see if it is being teared down, but of course also teared up.
Cool, you know that the LocalDB will be freshly spawned every time you run the build script. Let’s first look at an utility that can deploy the DacPac file, and then setup the necessary commands to deploy the DacPac to LocalDB.
Adding SqlPackage to project
To deploy the DacPac file to LocalDB, you need an utility to be able to do so. Therefore, SqlPackage is being used, which is a command-line tool for the DacFx framework. The DacFx framework exposes public DacFx APIs, which integrates a mechanism for deploying your database into your environment. Let’s add a section to retrieve the latest SqlPackage utility and use it to deploy the DacPac file
- Once more in the parameter section, introduce a new parameter where tooling will be installed, in this case SqlPackage
[string]$ToolsPath = "$BuildRoot\Tools"- In the Init task, add the following content to check if SqlPackage is installed, and if not, retrieve the latest version just under the starting of the localDB instance
task Init {
    Write-Build Yellow "Creating LocalDB instance: $Instance"
    exec {
        sqllocaldb create $Instance
    }

    if (-not(Get-Command -Name sqlpackage -ErrorAction SilentlyContinue)) {
        if (-not(Test-Path $ToolsPath)) {
            New-Item -Path $ToolsPath -ItemType Directory
        }

        Write-Build Yellow "Downloading SqlPackage.exe"
        $Uri = 'https://aka.ms/sqlpackage-windows'
        $Download = Invoke-WebRequest -Uri $Uri -OutFile "$ToolsPath\SqlPackage.zip"

        Expand-Archive -Path "$ToolsPath\SqlPackage.zip" -DestinationPath "$ToolsPath\SqlPackage" -Force
    }
}
Run the Invoke-Build cmdlet with the -Task Init to see if it is downloading SqlPackage.
You now have the SqlPackage command line utility in your belt to deploy the DacPac file to LocalDB. A new task to deploy the package, will be the next step.
Deploy DacPac file
Before you will deploy the DacPac file, you will need a publishing profile xml that can be used by DacFx to control the deployment of your DacPac.
- In the project directory, create a file called superheroes.local-publish.xml and add the content below
<?xml version="1.0" ?>
<Project ToolsVersion="14.0" xmlns="http://schemas.microsoft.com/developer/msbuild/2003">
  <PropertyGroup>
    <TargetDatabaseName>SuperHeroes</TargetDatabaseName>
    <TargetConnectionString>Data Source=(localdb)\SuperHeroes;Integrated Security=True;Packet Size=4096</TargetConnectionString>
    <ProfileVersionNumber>1</ProfileVersionNumber>
  </PropertyGroup>
</Project>- Make sure the file is saved
- Create a new task under the Init task called Deploy with the following code
task Deploy {
    Set-Alias SqlPackage (Resolve-Path "$ToolsPath\SqlPackage\sqlpackage.exe").Path
    $LocalPublishProfile = (Get-ChildItem "$BuildRoot\src\$ProjectName\$ProjectName.local-publish.xml").FullName
    Write-Build Yellow "Deploying database with profile: $LocalPublishProfile"

    exec {
        sqlpackage /Action:Publish /Profile:$LocalPublishProfile /SourceFile:$DacPacFile
    }
}- Add the Deploy task to default run
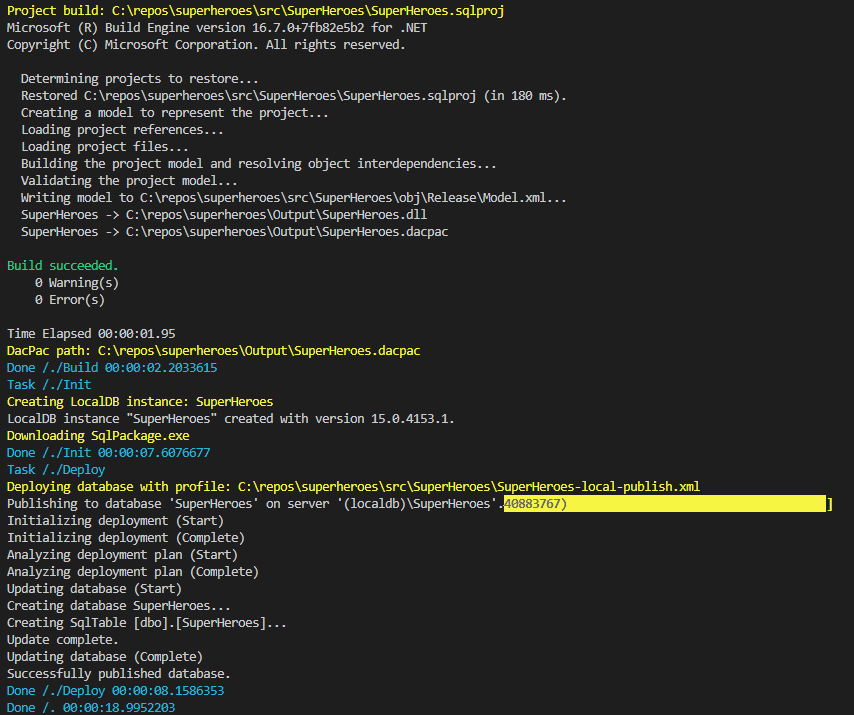
task . Clean, Build, Init, DeployRun the Invoke-Build cmdlet once to see if the DacPac deploys successfully.
You have now created the ability to deploy the DacPac locally to a LocalDB instance! To see the results, you will have to add the mssql extension to VSCode
Verifying results
The mssql extensions has some rich functionality to connect to SQL Servers. Instead of using a heavier tool like SQL Server Management Studio, you are going to add the extension to VSCode, and check if table has been populated.
Again, this extension is also available for Azure Data Studio, so you should be able to follow along if you are using Azure Data Studio
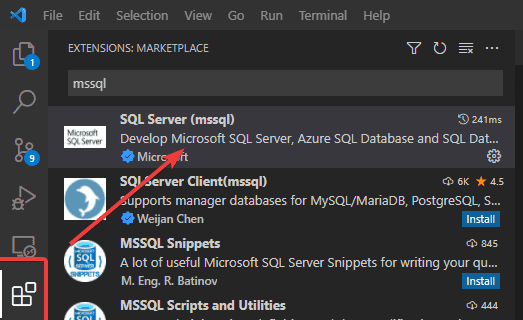
- In your VSCode editor, go to the Extensions and search for mssql
- Click on Install
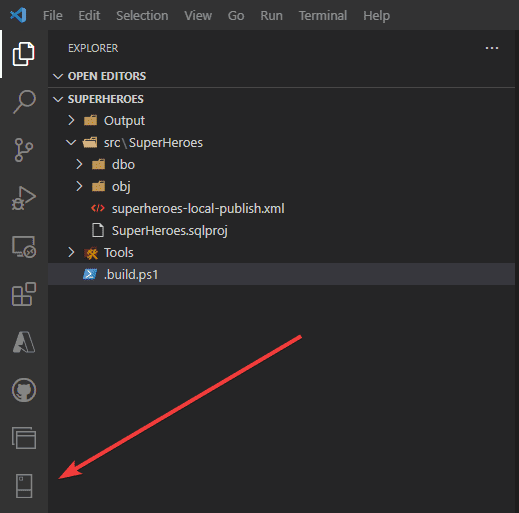
- After the Extension is installed, you notice that a new Icon has appeared, click on it
- Click the + Add Connection
- Fill in the connection string (localdb)\SuperHeroes, press Enter once and select the Integrated Authentication Type
- If you want to save the profile, do so, or press enter once more
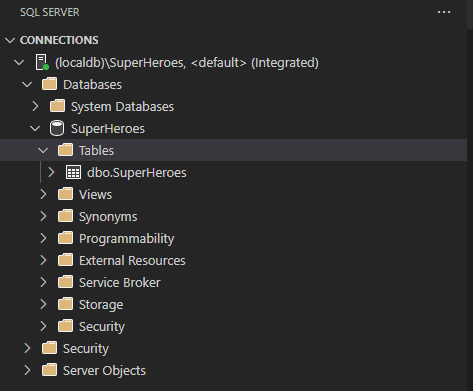
You are now connected and can view the SuperHeroes database deployed, including the table!
Cleanup
Let’s add one more line to the Clean task, so you are able to always check if the process is repetitive.
- Add the following lines at the top of the Clean task
Remove-Item "$SolutionDir\$ProjectName\bin" -ErrorAction SilentlyContinue -Force -Recurse
Remove-Item "$SolutionDir\$ProjectName\obj" -ErrorAction SilentlyContinue -Force -Recurse
Remove-Item $BuildDir -ErrorAction SilentlyContinue -Force -Recurse
Remove-Item $ToolsPath -ErrorAction SilentlyContinue -Force -Recurse- Run the
Invoke-Build -Task Cleancmdlet to cleanup the project
Cool, you now have created a process which can instantly spawn up, but also the ability to be teared down, which becomes in handy when you are doing deployments through CI/CD tooling.
Conclusion
Microsoft.Build.Sql SDK-style SQL project simplifies the need to add wildcard file selection by default. It allows database developers to work in cross-platform environments to develop database projects. With the additional knowledge that you’re now armed, you have also gained an understanding in how you can rapidly deploy the database on a LocalDB instance, giving you the confidence the build will work.
While LocalDB is quite lightweight, can you already think of other scenarios to deploy your DacPac too? Say a docker container? Maybe you can spin up an Azure SQL database? There are always multiple ways!
Stay tuned for the next part, where you will be going to add a tSQLT framework side-by-side to your existing project to test out your changes.


