If you went through the first part of this tutorial series, you are going to add an existing project side-by-side you’re working project. This is also known as a composite project, where you will create a reference to the other main database project, and also include the tSQLt DacPac as a reference for deployment, as this includes all the objects to run tSQLt tests. So, if you did not follow along with the first series, make sure you do that first to follow along with this second part! If you’re already there, let’s get started.
Creating test project
You want to make sure that you are deploying your changes to test your main database, aren’t going to be deployed all the way through production. You want to segregate your tests, but gain the ability to deploy them with the actual changes you do in the main source database project. Let’s have a look how this will look like.
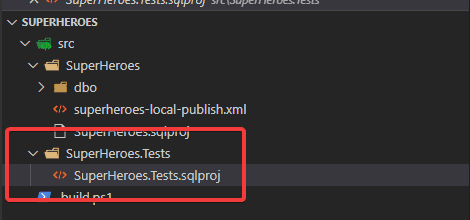
- In your src folder, create a new folder called SuperHeroes.Tests and add a new SuperHeroes.Tests.sqlproj file
- Copy the following content in the SuperHeroes.Tests.sqlproj file
<?xml version="1.0" encoding="utf-8"?>
<Project DefaultTargets="Build">
  <Sdk Name="Microsoft.Build.Sql" Version="0.1.3-preview" />
  <PropertyGroup>
    <Name>SuperHeroes.Tests</Name>
    <DSP>Microsoft.Data.Tools.Schema.Sql.Sql150DatabaseSchemaProvider</DSP>
    <ModelCollation>1033, CI</ModelCollation>
    <ProjectGuid>{068f661c-50d4-45c6-9c1c-8f2b2134b40d}</ProjectGuid>
  </PropertyGroup>
</Project>- Make modifications to include the testing project in the build task itself
task Build {
    $Projects = Get-ChildItem -Path $SolutionDir -Filter "*.sqlproj" -Recurse
    $Projects | Foreach-Object {
        $Output = Join-Path -Path $BuildDir -ChildPath (Split-Path -Path $_.FullName -LeafBase)
        Write-Build Yellow "Project build: $($_.Name)"
        exec {
            dotnet build $_.FullName -c $Configuration /p:NetCoreBuild=True -o $Output
        }
    }
}- Create a publish profile named superheroes.tests.local-publish.xml for test project that will be used locally in the project directory with the content below
<?xml version="1.0" ?>
<Project ToolsVersion="14.0" xmlns="http://schemas.microsoft.com/developer/msbuild/2003">
  <PropertyGroup>
    <IncludeCompositeObjects>True</IncludeCompositeObjects>
    <TargetDatabaseName>SuperHeroes.Tests</TargetDatabaseName>
    <TargetConnectionString>Data Source=(localdb)\SuperHeroes;Integrated Security=True;Packet Size=4096</TargetConnectionString>
    <ProfileVersionNumber>1</ProfileVersionNumber>
  </PropertyGroup>
</Project>
You notice that there is now an additional property set which is IncludeCompositeObjects, this specifies whether to include referenced or external elements to be composes against the source database and update it in a single deployment operation
- Make changes to both .sqlproj files to include the publishing profiles to be copied to the output
<ItemGroup>
    <None Include="superheroes.local-publish.xml">
        <CopyToOutputDirectory>Always</CopyToOutputDirectory>
    </None>
</ItemGroup><ItemGroup>
<None Include="superheroes.tests.local-publish.xml">
<CopyToOutputDirectory>Always</CopyToOutputDirectory>
</None>
</ItemGroup>- Lastly, make a reference in the test project to the source database project
<ItemGroup>
    <ProjectReference Include="..\SuperHeroes\SuperHeroes.sqlproj">
      <Name>SuperHeroes</Name>
      <Project>{068f661c-50d4-45c6-9c1c-8f2b2134b40d}</Project>
      <Private>True</Private>
      <SuppressMissingDependenciesErrors>True</SuppressMissingDependenciesErrors>
    </ProjectReference>
  </ItemGroup>
Make note, you’re project GUID might be different
Let’s run the Invoke-Build cmdlet with the Clean and Build for now to see what happens.
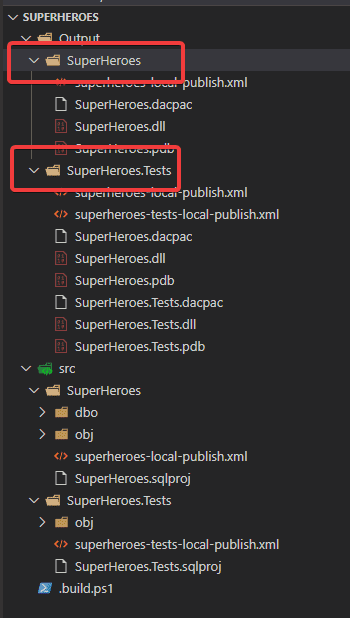
You can see that both database projects are build, only the test project includes also the source database project, which is exactly what you want. This is where the IncludeCompositeObjects is going to come in to play. Now before you continue, you need something to test of course, so let’s dive into tSQLt.
Creating a tSQLt test
In this section, you are going to create a tSQLt test to add a simple test to see if the SuperHeroes table exist and if you can insert a record.
If you are not familiar with the tSQLT framework, have a look at tSQLT tutorial.
- In the project folder of the test project, add a new folder called Tests where you will store your tests
- Create a file called test If table dbo.SuperHeroes exist.sql
- Add the following content to test if the table SuperHeroes exist
/*
Description:
Test if the table dbo.SuperHeroes exists

Changes:
Date        Who                 Notes
----------  ---                 --------------------------------------------------------------
23/05/2022  TheLonelyEngineer   Test if dbo.SuperHeroes exist
*/
CREATE PROCEDURE [dbo].[test If table dbo.SuperHeroes exists]
AS
BEGIN
    SET NOCOUNT ON;

    ----- ASSERT -------------------------------------------------
    EXEC tSQLt.AssertObjectExists @ObjectName = N'dbo.SuperHeroes';
END;- Make sure you save the file
- Create a file called Add_SuperHero.sql in the tests folder to create a schema
/*
Description:
Test if you can insert a record in the SuperHero table

Changes:
Date        Who                 Notes
----------  ---                 --------------------------------------------------------------
23/05/2022  TheLonelyEngineer   Test if you can insert a record into the table
*/
CREATE SCHEMA [Add_SuperHero]
    AUTHORIZATION dbo
GO
EXECUTE sp_addextendedproperty @name = 'tSQLt.TestClass', @value = 1, @level0type = 'SCHEMA', @level0name = 'Add_SuperHero'- Lastly, create a file called test Add_SuperHero returns the inputs.sql to test if you can add a super hero to the table
CREATE PROCEDURE [Add_SuperHero].[test Add_SuperHero returns the inputs]
AS
DECLARE @SuperHero AS NVARCHAR(50) = 'Superman';
DECLARE @CoolnessRating AS SMALLINT = 6;

IF OBJECT_ID('actual') IS NOT NULL DROP TABLE actual;
IF OBJECT_ID('expected') IS NOT NULL DROP TABLE expected;

CREATE TABLE expected
(
    SuperHero varchar(50),
    CoolnessRating int
);

CREATE TABLE actual
(
    SuperHero varchar(50),
    CoolnessRating int
);

INSERT INTO expected
    (SuperHero, CoolnessRating)
VALUES
    ('Superman', 6);

INSERT INTO actual
    (SuperHero, CoolnessRating)
EXECUTE [dbo].[Add_SuperHero] @SuperHero, @CoolnessRating;

EXECUTE tSQLt.AssertEqualsTable 'expected', 'actual';
Let’s add the reference to the tSQLT DacPac file to include all necessary objects for the tSQLt framework to run
Adding tSQLt framework
tSQLt framework exposes the DacPac files to be used as a reference in your test project, which comes in handy when deploying the test project itself. Let’s retrieve the latest version of the tSQLt framework.
- Open your favorite browser and paste in the following URL https://tsqlt.org/download/tsqlt/ to download the latest version
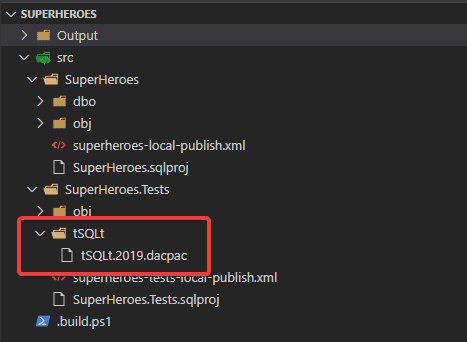
- Extract the latest DacPac file inside the tSQLtDacpacs folder of the version that was downloaded to a new folder called tSQLt in the root of the test project
- Open up the .sqlproj file of the test project and make a reference to the tSQLt DacPac
<ItemGroup>
    <ArtifactReference Include="tSQLt\tSQLT.2019.dacpac">
      <HintPath>tSQLt\tSQLT.2019.dacpac</HintPath>
      <SuppressMissingDependenciesErrors>True</SuppressMissingDependenciesErrors>
    </ArtifactReference>
</ItemGroup>
You need to make sure while deploying the tSQLt framework to the test database, that CLR is enabled. This is one off the pre-requisites, so let’s add a PreDeployment script which does so.
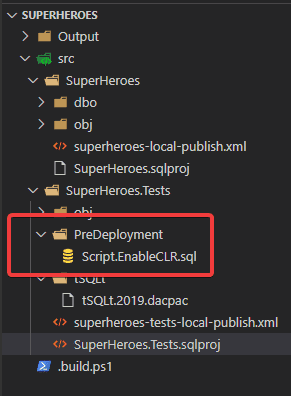
- Create a new folder called PreDeployment in the root of the project, inside this folder add a file called Script.EnableCLR.sql
- Add the following content to the file and make sure you save it
EXEC sp_configure 'show advanced options', 1;
RECONFIGURE

EXEC sp_configure 'clr strict security', 0;
EXEC sp_configure 'clr enabled', 1;
RECONFIGURE

EXEC sp_configure 'show advanced options', 0;
RECONFIGURE- Open up the .sqlproj file of the test project and add the predeployment script
<ItemGroup>
    <PreDeploy Include="PreDeployment/Script.EnableCLR.sql" />
</ItemGroup>
Alright, let’s see what it does by running Invoke-Build once with the Clean and Build task.
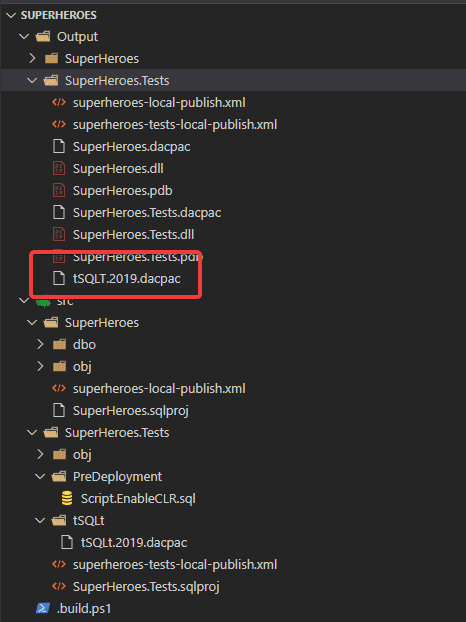
The tSQLt DacPac is also included now. Let’s modify the Deploy task to include the test project to see what is happening.
Modify deploy task
- Open the .build.ps1 script and replace the content of the Deploy task with the following to dynamically pick up the projects to be deployed
task Deploy {
    Set-Alias SqlPackage (Resolve-Path "$ToolsPath\SqlPackage\sqlpackage.exe").Path

    Write-Build Yellow "Project retrieval: $BuildDir"
    $Projects = Get-ChildItem $BuildDir
    foreach ($Project in $Projects) {
        $DacPacFile = Join-Path $Project.FullName -ChildPath ($Project.Name + '.dacpac')
        $LocalPublishProfile = Join-Path $Project.FullName -ChildPath ($Project.Name + '.local-publish.xml')
        Write-Build Yellow "Deploying file: $DacPacFile with profile: $LocalPublishProfile"

        exec {
            sqlpackage /Action:Publish /Profile:$LocalPublishProfile /SourceFile:$DacPacFile
        }
    }
}
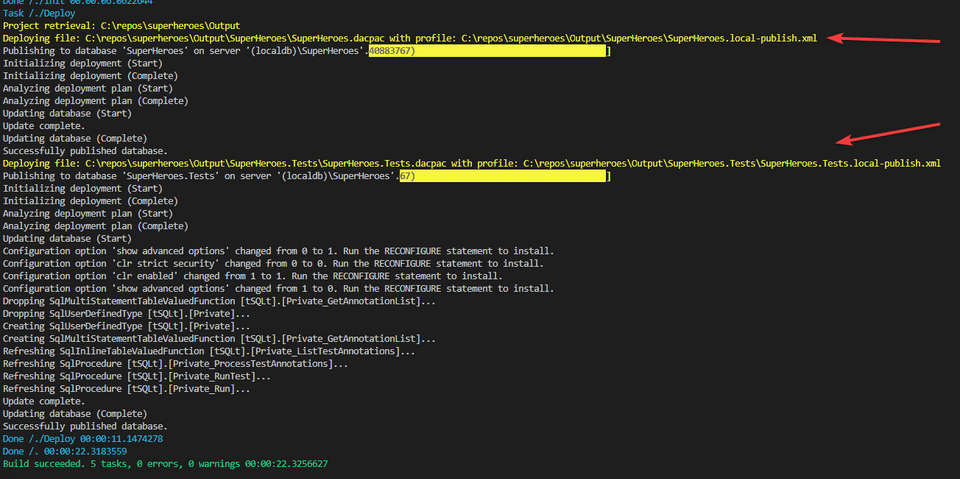
You now have successfully replaced the Deploy task. Run the defaults to see what happens by calling Invoke-Build.
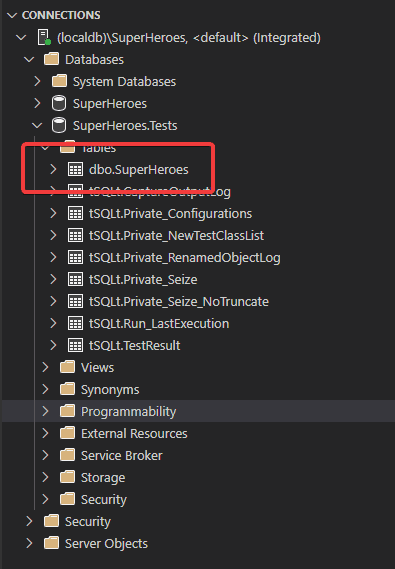
If you open up the SQL Server extension and connect to the LocalDB instance, you can see that the test project is successfully deployed, including the table you’ve created in the source!
Okay, let’s add one more task to the build script to execute the test and retrieve some code coverage.
Executing unit test with code coverage
To be able to execute unit test with code coverage results included, you’ll need a package that generates this for you. An awesome dude by the name of Ed Elliot created this in the past and your gonna use this open source project to include his package.
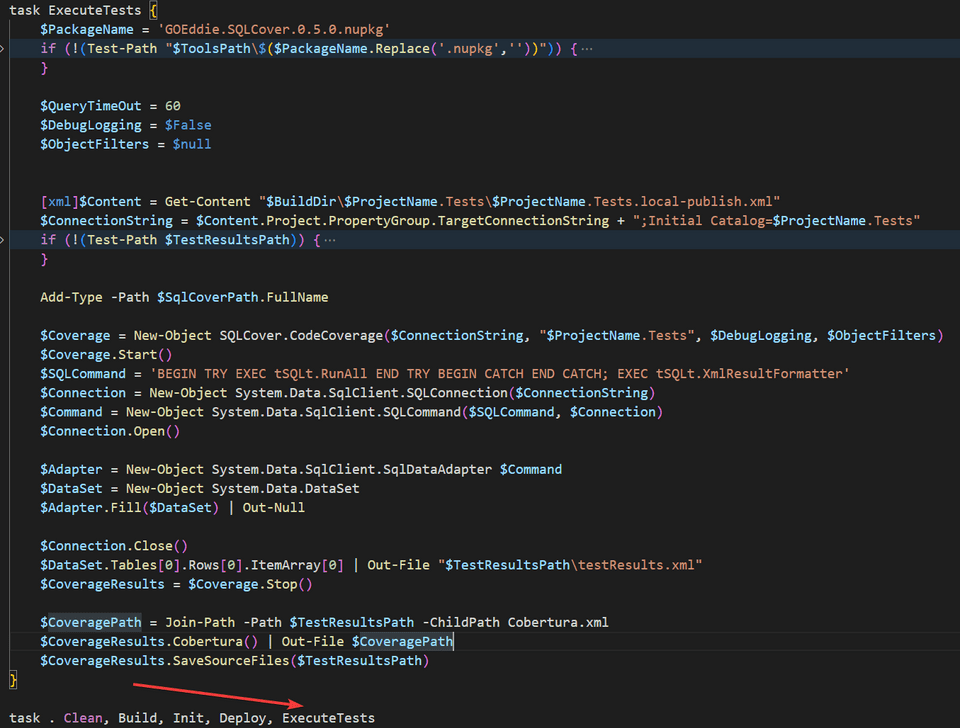
- Add a new task called ExecuteTests and with the following content
task ExecuteTests {
    $PackageName = 'GOEddie.SQLCover.0.5.0.nupkg'
    if (!(Test-Path "$ToolsPath\$($PackageName.Replace('.nupkg',''))")) {
        Write-Build Yellow "Saving SQLCover: $ToolsPath\$PackageName"
        try{
            $Uri = 'https://www.nuget.org/api/v2/package/GOEddie.SQLCover/0.5.0'
            Invoke-WebRequest -Uri $Uri -OutFile "$ToolsPath\$PackageName"
        } catch {
            Throw "Error retrieving: $_"
        }

        Expand-Archive -Path "$ToolsPath\$PackageName" -Destination "$ToolsPath\$($PackageName.Replace('.nupkg',''))"

        $SqlCoverPath = Get-ChildItem $ToolsPath -Filter SQLCover.dll -Recurse
    }
}- Create the required parameters to setup the code coverage collector
$QueryTimeOut = 60
$DebugLogging = $False
$ObjectFilters = $null


[xml]$Content = Get-Content "$BuildDir\$ProjectName.Tests\$ProjectName.Tests.local-publish.xml"
$ConnectionString = $Content.Project.PropertyGroup.TargetConnectionString + ";Initial Catalog=$ProjectName.Tests"
if (!(Test-Path $TestResultsPath)) {
    New-Item -Path $TestResultsPath -ItemType Directory
}

Add-Type -Path $SqlCoverPath.FullName

$Coverage = New-Object SQLCover.CodeCoverage($ConnectionString, "$ProjectName.Tests", $DebugLogging, $ObjectFilters)- Make sure you introduce the new
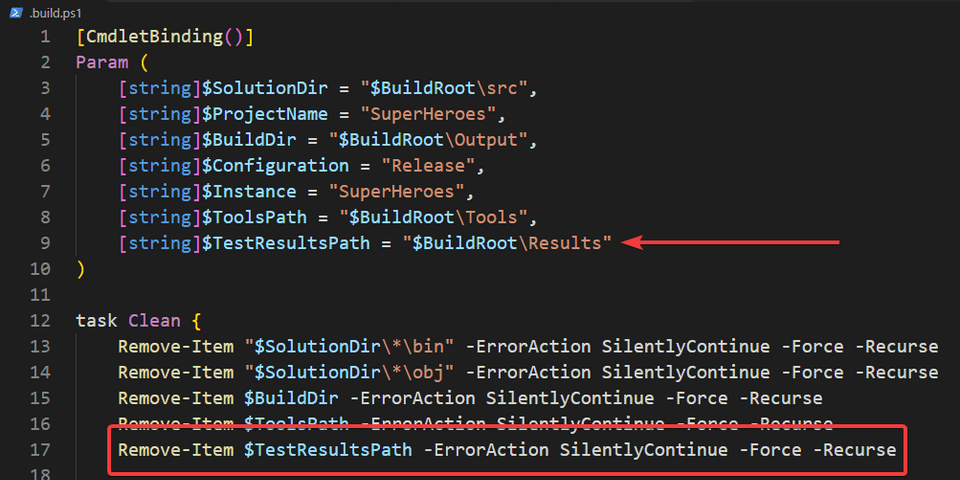
$TestResultsPathalso as a parameter at the top of the build script and include it in the cleaning
- Now, start the collector, run the unit tests and save the results
$Coverage.Start()
$SQLCommand = 'BEGIN TRY EXEC tSQLt.RunAll END TRY BEGIN CATCH END CATCH; EXEC tSQLt.XmlResultFormatter'
$Connection = New-Object System.Data.SqlClient.SQLConnection($ConnectionString)
$Command = New-Object System.Data.SqlClient.SQLCommand($SQLCommand, $Connection)
$Connection.Open()

$Adapter = New-Object System.Data.SqlClient.SqlDataAdapter $Command
$DataSet = New-Object System.Data.DataSet
$Adapter.Fill($DataSet) | Out-Null

$Connection.Close()
$DataSet.Tables[0].Rows[0].ItemArray[0] | Out-File "$TestResultsPath\testResults.xml"
$CoverageResults = $Coverage.Stop()

$CoveragePath = Join-Path -Path $TestResultsPath -ChildPath Cobertura.xml
$CoverageResults.Cobertura() | Out-File $CoveragePath
$CoverageResults.SaveSourceFiles($TestResultsPath)- Add the ExecuteTests task to the default execution of
Invoke-Build
Everything is setup to store the results, so run the Invoke-Build cmdlet to see what happens.
Oops! You never totally added the stored procedure to the source project. Let’s say it was a successfully failed test then, but let’s fix it!
- In your source main project, in the Stored Procedures folder, add a file called Add_SuperHero.sql with the following content to add a super hero
CREATE PROCEDURE [dbo].[Add_SuperHero]
    @SuperHero nvarchar(128),
    @CoolnessRating smallint
AS
SELECT @SuperHero, @CoolnessRating
RETURN 0- Make sure you save the file and run
Invoke-Buildonce more
You’ll now notice that the test is successfully now!
This section went quite quickly, so what did you do exactly?
- In the first step, you are retrieving the SQLCover.dll from NuGet
- The required parameters to start collection are created based on the connectionstring inside the publishing profile
- The collector is started and with the EXEC tSQLt.Runall, all the tSQLt tests are triggered
- With the XmlResultFormatter stored procedure, the test result file is generated
- After all test have run, the collector is stopped, retrieving all the content and outputting it in Cobertura.
Cobertura is a reporting tool that calculates test coverage. This report can be consumed by modern CI/CD systems.
Series conclusion
If you made it such far, you’ve successfully created a fundament on developing your database projects, including unit testing with tSQLt and calculating the code coverage with the new SDK-style approach.
Can you think of a scenario how this will fit in your CI/CD pipelines? Are you going to extend your testing? As always, there is enough exploration!
